Posts Tagged With: crocheting

Free Pattern Friday: Crochet Amigurumi Toy Horse

It’s already apparent that I’m accustomed to making projects much harder than they need to be. This crocheted pink toy horse was my very first attempt at a crocheted toy and originally, I was looking to follow a pattern out of a book. I came to terms with the fact that I just can’t be pigeon-toed into following directions. I wanted to create something similar but unique and since I recently gained yarn from my old neighbor and sister, I really didn’t have the choice of using “correct” colors for this.

20140717-144633-53193751.jpg

Supplies Needed:
Patience
Fine Yarn (3-5 colors optional)
4.0 mm hook
Yarn Needle
Stuffing

If you have a pattern for a horse head and body that you prefer, please don’t hesitate to use it and skip to the leg section of this pattern.

To Start: Select the color you are looking to work with and your hook.
Row 1: Ch 2, sc 6 in first ch, do not connect to make rows; (climb instead, rows will appear to be rows without that noticeable connection space), sc 2 onto first sc in row 1.
“Row 2” sc 2 in each of the 5 remaining sc’s from row 1, sc 1 into next one.
“Row 3” sc around making a total of 17 sc’s; the method used and count in each stitch won’t make a difference unless you load 3 or more into one stitch on the way around.
“Row 4” repeat Row 3.
“Row 5” descend in stitches from Row 4 by 2; sc 1 around 8 stitches, skip 1 stitch, sc 1 into next 8 stitches.
“Row 6” repeat Row 5. This will start making the nose more distinct.
“Row 7” repeat Row 6.
“Row 8” expand back to sc 18 stitches doubling up in the two stitches you removed in the last two rows. This will begin to build the face where the eyes will go.
“Row 9” expand to sc 20 stitches total remembering to expand by 2 sc’s in that row.
“Row 10” repeat row 9.

Stuff the head as well as you can before descending in stitches to close it up.

“Row 11” descend sc’s by 2 remembering to skip two stitches of equal distance from each other.
“Row 12” descend sc count again by 2.
“Row 13” descend sc count by 4.
“Row 14” sc 9.
“Row 15” sc 5.

Stuff more into the head. I found that by stuffing with the hook’s end and swirling the stuffing around helped get more into the head than closing it without the additional stuffing.
“Row 16” sc 2, making sure to ch 1 additional, pull through and tie off.

Your horses head is complete.

Next starting from what should be considered the end of the jaw or “Row 10” create an oval lining up with the back of the head. Mine shows sc 10 stitches around.
“Row 17” sc 14, adding sc 2 in the front and back of the neck, this will begin to build the chest and back of the head where the mane will go.
“Row 18” sc 18, adding 2 sc 2’s in the front and back of the neck in the similar location as the additional 2 stitches in row 17.
“Row 19” sc 20 only adding 3 sc 2’s in the front in the same region as the previous rows in the chest. You should notice the build up in the front take on a shapely round curve in the front and a stumpy area in the back.
Repeat row 19 for “Rows 20 -22”

Stuff the chest enough to be able to hold the chest and work on the remainder of the body.

“Row 23” sc 26 around, repeat this for “Rows 24-27”
“Row 28” sc 22 skipping 4 stitches around. The particular order does not matter so long as the four stitches that will be skipped are not all in a row.

Stuff the chest some more, as much as you can without fully extending the sc stitches that have already been made to expose the stuffing. You will know when you have stuffed it too much. Remove any extra stuffing that may have exposed these areas.

“Row 29” sc 18, skipping 4 stitches around, similar to row 28.
“Row 30” sc 12, skipping 6 stitches around.
“Row 31” sc 8, skipping 4 stitches around.

Stuff any additional stuffing if you find you need more to shape the chest.

“Row 32” sc 5, skipping 3 stitches around.
“Row 33” sc 2, skipping 3, ch 1 to tie off.

The chest is now finished.

Start the back and stomach by picking a spot on the back of the neck to start the body. I went about half way down the back and started there and made sure to build the body by making an oval as close as I could to a circle in the first round of stitches. Please keep in mind this is harder than it looks when any of the body parts are stuffed.

“Row 34” slip stitch into the middle of the back and tie a knot. Sc 19 all the way around towards the base of the chest and back to the back.
“Row 35” repeat the same 19 stitches.
“Row 36” sc 24 adding sc 2’s in the stomach area to expand the oval into a circle on the right and left of the horse’s stomach.
“Row 37” sc 28 adding sc 2’s again in the stomach area.
“Row 38” sc 28 around in the next four rows: “Row 39-42”.
“Row 43” sc 24 descending in stitches in 4 stitches even from each other.
“Row 44” sc 20, descending in stitches in 4 stitches even from each other.
“Row 45” sc 16 descending in stitches in 4 stitches even from each other.

Stuff the stomach. This will show you how to close the stomach. It’s better to have a rounded end as this helps the height in the rump area.

“Row 46” sc 12 descending in stitches in 4 stitches even from each other.
“Row 47” sc 8 descending in stitches in 4 stitches even from each other.
“Row 48” sc 5 descending in stitches in 3 stitches even from each other.
“Row 49” sc 2 descending in stitches in 3 stitches even from each other, ch 1 to tie off.

This ends the stomach.

Next is the rump. I designed this horse to be similar to real life ones with all of their curves so the rump will rest higher than the highest point in the back by a couple of stitches and roughly the same at the belly. To achieve this start the stitching at the “Row 38”.

“Row 50” slip stitch into “Row 38” and tie a knot. This has to be stitched as a circle, flesh it out with extra sc stitches if you need to, to make it round. I used sc 26.
“Row 51” sc 34 all the way around expanding primarily in the top of the rear adding sc 2 every other stitch.
“Row 52” sc 34, repeat in the next 4 rows: “Row 53-56”
“Row 57” sc 28, descending in stitches in 6 stitches even from each other.
“Row 58” sc 20, descending in stitches by 8 stitches even from each other.
“Row 59” sc 14 descending in stitches by 6 stitches even from each other.

Stuff the Rump.

“Row 60” sc 12, descending in stitches by 2 stitches even from each other.
“Row 61” sc 8, descending in stitches by 4 stitches even from each other.
“Row 62” sc 5, descending in stitches by 5 stitches even from each other.
“Row 63” sc 2, descending in stitches by 3 stitches even from each other, ch 1, pull through to tie off.

The legs…were the most annoying part of all of this because it’s a tiny space to work in.

crochethorse3

Each of the legs consisted of four closely crocheted ovals as bases, their positions are entirely up to you. I am going to explain the creation of the thigh, calf and hoof to one leg. As the front were more irritating than the back, I’ll explain the front.

To start the thigh, slip stitch onto the side that you would like to build it onto first. I’d suggest starting at the top of the oval and working your way around.
Sc 2 into one stitch, sc 4, curve by sc 2 into next 1 stitch, sc 4 and connect to first sc. Continue first row exactly the same way 4 times. Stuff. This will be difficult. I used the end of my hook, stuffed and swirled it around until it packed the thigh enough to work on closing it.
Sc 8 around descending by 2 stitches equally from each other.
Sc 4 around descending by 4 stitches equally from each other.
Sc 2 around descending by 2 stitches equally from each other, ch 1, pull through to tie off.

Create the calf muscle by recreating the same oval on the back side of the thigh.
Sc 2 into one stitch, sc 4 curve the oval by sc 2 into the next 1 stitch, sc 4 and connect to first sc.
The calf muscle generally gets smaller towards the hoof in pictures of horses, the next row will descend in stitches to achieve this.
Sc 8 around descending in stitches by 4 equally from each other.
Repeat Sc 8 in next 5 rows, last row will ch 1 to tie off.

Stuff calf muscle up to the rim and select hoof color.
Sc 8 for next 3 rows.
Sc 5 descending in stitches by 3 stitches equally from each other.

Stuff the hoof too before closing the leg up.
Sc 2 descending in stitches by 3 stitches equally from each other, ch 1 to tie off.

The trick to the legs are simple once you thing about it. You will need to create halves of legs to get the bend correct. Keep in mind that it’s very important to make sure that every leg is proportionately correct or the design will be flawed and your horse will not stand up.

The tail.
Building the tail is similar to the neck. You will slip stitch and crochet a circle a little higher than the middle of the rear-end, which is where its located on a regular horse, sc 6 stitches around.
Repeat the sc 6 in the next row.
You will start building an oval which will build the lower area of the tail.
Sc 3, sc 3 in one stitch, sc 3.
Sc 4, sc 3 in same area as the 3 stitches above, sc 4.
Sc 4, sc 3 in same stitch, sc 2 in next stitch, sc 2 in next stitch, sc 2 in next stitch, sc 2.
Sc 2 in every stitch for this row and the next two rows.

Stuff the Tail.

On one side, sc through both sides of the tail closing the gap between them.
Ch 2, dc 2 into both sides (do this by pinching both sides together and going through two open stitches one on close to you and the other farther from you) do the same dc 3 in the next stitch, sc 1 in next stitch to create a ruffle; ch 2, dc 5 into next stitch attaching front and back as described before, sc 1 in next stitch; ch 2, dc 5 into next stitches, sc 1; ch 2, dc 5 in next stitches, sc 1, ch 1 to tie off, leave slack to sew in and excessively sew the area you just stitched up in case you missed anything.

The mane is up to you, but this is what I did.

To achieve this look, start from the center of the top of the head and sc one line down the middle of the back of the neck ending at the base of the shoulder area and turn.
ch 2, dc up the way you came, until the second to last stitch, these will be hdc 1, and sc 1, Turn.
ch 1, skip one stitch,  sc on the way back down, turn.
– ch 1 and use the dc 5 to sc 1 pattern for the scalloped design found in the tail. Once finished, ch 1, tie off and sew in.

Add the ears directly on the head.
Slip Stitch and tie a knot where you would like the first ear to be.
Sc 3 into same stitch, Turn.
Ch 1, hdc 1 into first stitch, sc 3, ch 1 to tie off. This should make a triangle.

Repeat this on the other side of the head where you would like the other ear to be.

For the facial features you are more than welcome to create a bottom lip.
This is going to simply be a sc line across the bottom of the nose, out only maybe two or three rows. I didn’t decide to do that though but it is easily the simplest part of this whole design.

Otherwise, sew in the eyes, nose and mouth with a yarn color of your choosing.

Sew in remaining areas and you’re done!

crochethorse4 

Categories: Art Portfolio, Plentiful Designs: Crochet Projects, Plentiful Designs: Free Pattern Friday | Tags: , , , , , , , , , , , , , , , | Leave a comment

Free Pattern Friday: 7″ Peacock Feather

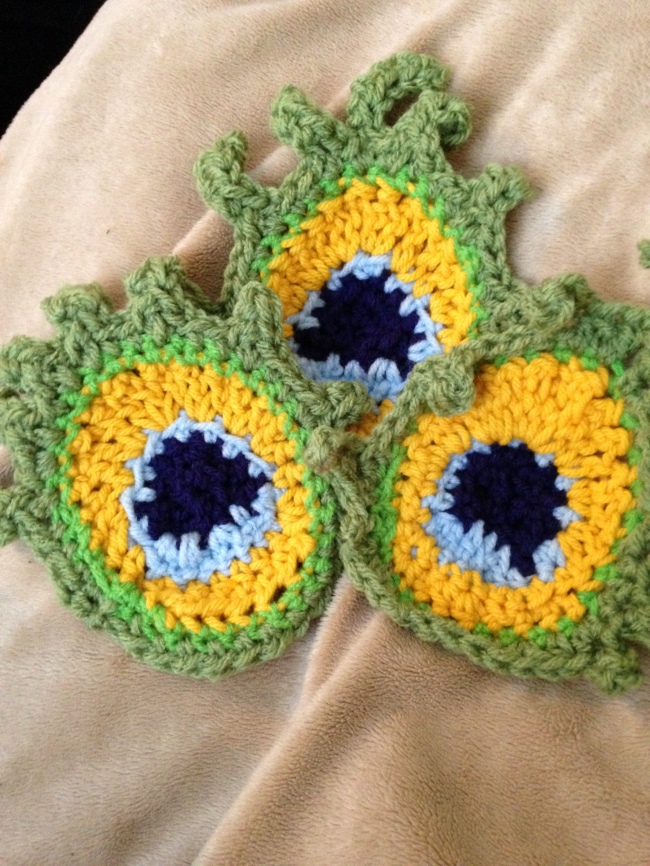
Crochet Peacock Feather: This pattern makes a 7″ Peacock Feather

Image

Supplies Needed
H Hook
Multiple Colors of Yarn (5)
Yarn Needle
Scissors

First Color
Row 1: Ch 3, hdc 6 into the first ch, TURN;
Row 2: hdc 1, dc 3 into next st, hdc 9, dc 3 into next st, hdc 2, ch 1 to tie off;

Second Color
Row 3: Slip stitch on (your right hand side) corner and tie a knot. Hdc 2 into same stitch, hdc 4 (going up towards the curve, if you’re on the flat part pull and start over), hdc 2 in same stitch, hdc 4, dc 2 in next stitch, dc 2, dc 2 in next 2 stitches, sc into same color first stitch, ch 1 to tie off;

Third Color
Row 4: Starting from the same corner as mentioned before: Slip Stitch and tie a knot. Sc 1 in same stitch, sc 1, hdc 1, dc 1, dc 2 in next stitch, tc 2 in next stitch, qs 2 in next stitch, ts 2 in next stitch, dc 2 in next stitch, dc 1, hdc 1 in same stitch, hdc 2, dc 1 in same stitch, dc 7, hdc 2in nest stitch, sc in same color first stitch;

Fourth Color
Row 5: Starting from the same corner as mentioned before: Slip stitch and tie a knot. Sc 1 in same stitch, sc 7, sc 2 in next 3 stitches, sc 1, sc 2 in next stitch, sc 9, sc 2 in next stitch, sc 7, sc into same color, ch 1 to tie off;

Fifth Color
Row 6: Starting from the same corner as mentioned before: Slip stitch and tie a knot. Hdc 2  in same stitch, hdc 3, ch4, hdc 1 in 2nd chain, hdc 1, dc 1 into base of feather, hdc 3, ch 5, hdc 1 in 2nd ch, hdc 1, dc 1 into base of feather, hdc 2, dc 1, ch 7, hdc 1 into 2nd ch, hdc 5, dc 1 into base of feather, ch 7, hdc 1 into 2nd ch, hdc 5, dc 2 into same base stitch, hdc 2, ch 5, dc 1 into 2nd ch, hdc 3, dc 1 into base of feather, hdc 4, ch 4, hdc 1 in 2nd ch, hdc 1, hdc into base of feather,hdc 3, ch 4, hdc 1 into 2nd ch, hdc 1, hdc 1 into base of feather, hdc 4, hdc 2 into next stitch, hdc 7, hdc 2 into next stitch, hdc 2, sc 1 into same color, ch 1 to tie off.

Sew in yarn tails.

Repeat for multiples

Image

Categories: Plentiful Designs: Free Pattern Friday | Tags: , , , , , , , , , , , , | Leave a comment

Finally Gearing Up Towards Normalcy

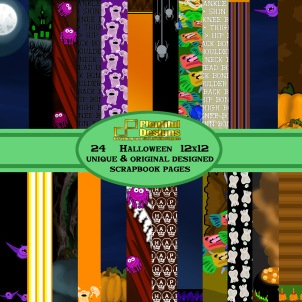
Although its been a long week, I can finally say our schedule is normal, and that I am starting back into a regular routine. I am starting to get into new projects and have already finished another pattern for tomorrow’s Free Pattern Friday. On the side I am doing a new blanket for my cousin, which is a lot of work and I will need to buckle down and get it done soon for shipping, but it is coming along nicely. Other projects including the ebook I will be coming out with hopefully next week, I am also designing an over haul of scrap-booking pages or online design pages that the artist in you can use. Unlike other vendors I will be bundling 24 designs in a low cost listing of $1.99 per package, and $5.00 for custom designed pages. I already have some of my original art listed in a Halloween one that can be seen here: https://www.etsy.com/listing/86881628/instant-download-original-designed? or below:
Image

Again, I will have more up soon and look forward to helping you come up with your specific ideas through custom pages. I will be launching all of this hopefully next month but if you are raring to go, contact me, and I will do my best to help you.

Categories: Plentiful Designs: Digital Scrapbooking Printable Packs | Tags: , , , , , , , , , , , , , , , | Leave a comment

Belated Free Crochet Pattern Friday: Baby Feet

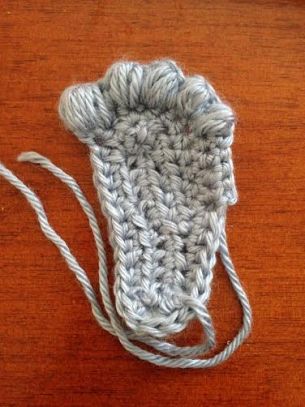
Baby Right and Left Foot Crochet Pattern
(Use same pattern for either foot: Push toes down and in to “pop” more depending on which direction you are looking to use them for. See picture below.)

Supplies Needed:

Yarn
H Hook
Yarn Needle
Scissors

Back Foot                                                                     Front Foot

 Image Image

Row 1: Ch 11, Turn.
Row 2: Hdc 1 into first ch, hdc 9, hdc 3 in last ch.
Row 3: Hdc 11, Turn.
Row 4: Hdc 3 into first st, hdc 6, Turn.
Row 5: ch 1, hdc 37 ( this will go up and all the way around the foot for one whole loop.

Toes:

The toes are made from Bobbles or Puffs, whichever is fine. A great diagram is below from http://www.redheart.co.uk/learn/articles/learn-crochet-puff-stitches:
Image
Your puff sizes are going to depend on your toes. Since we are working from left to right on this foot, you will be working with the pinky toe and working your way to the big toe. Of course this would change if you are doing left-handed crochet.

Row 6:
Big Toe: ch 2, 8hdc cluster/puff st, ch 1, sc 1 into same st as puff st;
“Index” Toe: ch 2, 5hdc cluster/puff st, ch 1, sc 1 into same st as puff st;
Middle Toe: ch 2, 5hdc cluster/puff st, ch 1, sc 1 into same st as puff st;
“Ring” Toe: ch 2, 4hdc cluster/puff st, ch 1, sc 1 into same st as puff st;
Pinky Toe: 3 Hdc cluster/puff st, ch 1, sc 1 into same st as puff st, hdc 5, ch 1 to tie off.

Sew in yarn tails to itself or onto a blanket, etc.

Categories: Plentiful Designs: Crochet Projects | Tags: , , , , , , , , , , , , , , , , , , | Leave a comment

Surfboard Blanket Part 2: The Waves

Surfboard Blanket Part 2: The Waves

Image

You will need:
Patience
H & J Hook
1 Turquoise Skein
1/2 Light Blue Skein
1/2 White Skein
Scissors
Needle

Choose White: H Hook:
Row 1: Starting from nose but all the way down to the last off white counting down 5 stitches (from the orange rows) slip stitch in the 6th stitch, tie a knot, ch 2, sc 1 in same stitch and sc 10, sc 2 in next stitch, sc 6, sc 2 in next stitch, sc 6, sc 2 in next stitch, sc 3, sc 2 in next stitch, sc 2′ sc 2 in next stitch, sc 42, sc 2 in next stitch, hdc 10, dc 2, dc 2 in next stitch, dc 2, dc 2 in next stitch, dc 2 in next stitch, sc 1, hdc 1, dc 2, dc 2 in next stitch, dc 2, dc 2 in next stitch, dc 1, hdc 8, sc 1, hdc 24, sc 11, sc 2 in next stitch, sc 5, sc 2 in next stitch, sc 9, sc 2 in next stitch, sc 4 sc 2 in next stitch, hdc 4, sc 3, sc 2 in next stitch, sc 12, sc 2 in next stitch, ch 1 to tie off.

Next you will only be working on one side.
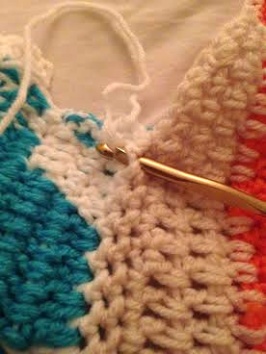
You will need both the H hook and the J Hook AND  both White and Turquoise yarns. You will be switching yarns through out the next 5-6 rows. If you don’t know how and dont want to try you can supplement the switch with turquoise all the way through those rows.

Row 2:
To start slip stitch with both Turquoise and White yarns, tie a knot, select White to crochet with leading Turquoise on the bottom but keeping them together so when you switch it’s with you instead of left at the beginning.
White: ch 2, dc 1 in same stitch that you tied into. Dc 2, dc 2 in next stitch, SWITCH to turquoise, (to switch pull up the secondary color from the bottom, slip stitch into the dc that was made last, tighten the primary color onto the secondary and guide down to the row before; using the secondary color to complete the next stitches) dc 2 in next 3 stitches, dc 1;
SWITCH to White, dc in same stitch, dc 2 in next stitch;
SWITCH to Turquoise, dc 2 in next stitch, dc 1, dc2 into next 3 stitches, dc 1;
SWITCH to White, dc 1 into same stitch, dc 1,
SWITCH to Turquoise, dc 1 into same stitch, dc 2, dc 2 into next stitch, dc 3, dc 2 into next stitch;
SWITCH to White, dc 1, dc 2 into next stitch, dc 1;
SWITCH to Turquoise, dc 2, dc 2 into next stitch, dc 4;
SWITCH to White, dc 2;
SWITCH to Turquoise, dc 7, dc 2 in next stitch, dc 4, dc 2 into next stitch, dc 2;
SWITCH to White, dc 1 in same stitch, dc 2 in next stitch;
SWITCH to Turquoise, dc 3, dc 2 in next stitch, dc 1, dc 2 in next stitch, dc 2;
SWITCH to White, dc 1 into same stitch, dc 2;
SWITCH to Turquoise, dc 2 in next stitch, dc 2, dc 2 in next stitch, dc 1, dc 2 in next stitch, dc 2;
SWITCH to White, dc 1 in same stitch, dc 2, hdc 2, sc 2;
SWITCH to Turquoise, sc 7;
SWITCH HOOK FROM H TO J:
 Take BOTH Turquoise AND White and crochet: hdc 2, sc 3, sc 2 in next stitch, sc 2, TURN;

Row 3:
Keep crocheting with the J hook:
Ch 1, skip on stitch, sc 1 into next stitch, hdc 6;
SWITCH HOOKS FROM J TO H: Stop crocheting with both colors and use Turquoise; dc1, dc 2 in next stitch, dc 2, dc 2 in next stitch, dc 1, dc 2 in next stitch;
SWITCH to White, dc 5;
SWITCH to Turquoise, dc 2;
SWITCH to White, dc 1 int same stitch, dc 1;
SWITCH to Turquoise, dc 13;
SWITCH to White, dc 1, dc 2 in next stitch, dc 1;
SWITCH to Turquoise, dc 11;
SWITCH to White, dc 3;
SWITCH to Turquoise, dc 17;
SWITCH to White, dc 1, dc 2 in next stitch;
SWITCH to Turquoise, dc 8;
SWITCH to White, dc 4;
SWITCH to Turquoise, dc 1 in same stitch, dc 10;
SWITCH to White, dc 2;
SWITCH to Turquoise, dc 1 in same stitch, dc dc 9;
SWITCH to White, dc 3;
SWITCH to Turquoise, dc 8;
SWITCH to White, dc 4;
SWITCH to BOTH, dc 1, TURN.

Row 4:
Keep crocheting with both and ch 1;
SWITCH to White, ch 1, dc 1 into next stitch, dc 3;
SWITCH to Turquoise, dc 10;
SWITCH to White, dc 3;
SWITCH to Turquoise, dc 12;
SWITCH to White, dc 3;
SWITCH to Turquoise, dc 13;
SWITCH to White, dc 3;
SWITCH to Turquoise, dc 9;
SWITCH to White, dc 3;
SWITCH to Turquoise, dc 1 in same stitch, dc 18;
SWITCH to White, dc 1 into same stitch, dc 2;
SWITCH to Turquoise, dc 1 into same stitch, dc 11;
SWITCH to White, dc 4;
SWITCH to Turquoise, dc 1 into same stitch, dc 2 into next stitch, dc 12;
SWITCH to White, dc 1;
SWITCH to Turquoise, hdc 1 int same stitch, dc 2;
SWITCH to White, dc 4;
SWITCH to Turquoise, dc 12;
SWITCH H HOOK TO J HOOK, hdc 1 into same stitch, hdc 7, TURN.

Row 5:
Keep using the J hook, ch 1, skip one stitch, sc 1 into next stitch, sc 2;
SWITCH J Hook to H Hook;
SWITCH use of BOTH yarns to Turquoise ONLY, dc 2 into next stitch, dc 3, dc 2 into next stitch, dc 10;
SWITCH to White, dc 1;
SWITCH to BOTH, dc 2;
SWITCH to Turquoise, dc 21;
SWITCH to White, dc 2;
SWITCH to BOTH, dc 3;
SWITCH to Turquoise, dc 12;
SWITCH to BOTH, dc 2;
SWITCH to Turquoise, dc 21;
SWITCH to BOTH, dc 2;
SWITCH to Turquoise, dc 10;
SWITCH to BOTH, dc 3;
SWITCH to Turquoise, dc 14;
SWITCH to BOTH, dc 2;
SWITCH to Turquoise, dc 16;
SWITCH to BOTH, dc 1;
SWITCH to Turquoise, dc 13;
SWITCH to BOTH, dc 2, TURN.

Row 6:
Still crocheting with BOTH, ch 2;
SWITCH to Turquoise, dc 49;
SWITCH to BOTH, dc 1;
SWITCH to Turquoi, dc 2, dc 2 in next stitch, dc 10, dc 2 in next stitch, dc 38;
SWITCH to BOTH, dc 2;
SWITCH to White, dc 2;
SWITCH to Turquoise, dc 21;
SWITCH to BOTH, dc 2;
SWITCH to White, dc 1;
SWITCH to Turquoise, dc 10, dc 2 in next stitch, dc 3, dc 2 in next stitch;
SWITCH to Both (don’t change to J hook), sc 4; TURN.

Row 7:
Still crocheting with both yarns on the H hook, ch 1, skip one stitch, sc 2;
SWITCH to Turquoise, dc 17;
SWITCH to BOTH, dc 2;
SWITCH to Turquoise, dc 24;
SWITCH to BOTH, dc 3;
SWITCH to Turquoise, dc 55;
SWITCH to BOTH, dc 1;
SWITCH to Turquoise, dc 50;
SWITCH to BOTH, dc 1, ch 1 to tie off.

STEP 2:
Go to the end of the board (the area where the J hook did the hdc to create the base of the larger wave). Here we’re gong to work on the ripple and work on joining the two waves. The reason we haven’t connected them so far is because I only wanted the one side of the board to have a wave and mimic it cresting or becoming a tube. Connecting both sides would have made it harder to showcase that ability in the blanket when it is finished.

Row 2 (is Row 2 because of the white row underneath, it will look like Row 1 because it’s a different color):
From the base of the wave created by the J Hook count 26 stitches, Turn, slip stitch and knot to start. Sc 2, hdc 1, dc 10, dc 2 in next stitch, dc 8, dc 2 in next stitch, sc 1 into the hdc the J hook made, sc 2, Turn.

Row 3 (will look like Row 2):
Dc 7, dc 2 in next stitch, dc 15, hdc 2, sc 5, hdc 1, dc 2 in next 3 stitches, dc 1, hdc 2, sc 8, hdc 1, dc 2 into next stitch, dc 9, hdc 1, sc 7, dc 4 into next stitch, dc 1, dc 2 into next stitch, dc 16, hdc 2, sc  6, dc 1, dc 3 into next stitch,  dc 20, hdc 1, sc 4, TURN.

Row 4 (will look like Row 3):
Ch 1, sc 1 in next stitch, sc 3, hdc 2, dc 19, dc 2 in next 3 stitches, hdc 13, dc 13 dc 2 in next 3 stitches, hdc 8, dc 1, dc 2 in next stitch, dc 4, dc 2 in next stitch, dc 4, dc 2 in next 2 stitches, hdc 9, dc 7, dc 2 in next 2 stitches, hdc 9, dc 1, dc 2 into next stitch, dc 20, sc 1 into the wave, sc 1 more above that stitch, TURN.

Row 5 (will look like Row 4):
Dc 22, dc 2 in next 2 stitches, dc 3, hdc 2, sc 4, ch 1 to tie off.

STEP 3:
Row 8: Using ONLY Turquoise: Time to connect. Go back to the larger wave and count in from the edge 13 stitches, slip stitch and tie a knot in stitch 14. Dc 3 in the sane first stitch, dc 141, hdc 2, sc 3, TURN.

Row 9:  Ch 1, sc 5, hdc 3, dc 139, TURN.
Row 10: ch 2, dc 2 in next 2 stitches, dc 4, dc 2 in next stitch, dc 11, dc 2 in next stitch, dc 3, dc 2 in next stitch, dc 12, dc 2 in next stitch, dc 42, dc 2 in next stitch, dc 61, hdc 1, sc 1, TURN.

Row 11: ch 1, sc 3, dc 2 in next 2 stitches, dc 1, dc 2 in next stitch, dc 5, dc 2 in next stitch, dc 1, hdc 2, sc 5, hdc 1, dc 1, dc 2 in next stitch, dc 2, dc 2 in next stitch, do 1, dc 2 in next stitch, dc 2, dc 9, hdc 2, sc 3, hdc 1, dc 1 in same stitch, dc 2 in next 2 stitches, dc 4, dc 2 in next stitch, dc 1, dc 2 in next stitch, hdc 3, hdc 2 in next stitch, dc 1, dc 2 in next stitch, dc 5, dc 2 in next stitch, dc 25, hdc 3, sc4, hdc 1, dc 1 in same stitch, dc 2 in next stitch, dc 2, dc 2 in next stitch, dc 8, hdc 2, sc 3, dc 19, hdc 2, sc 3, ch 1 to tie off.

STEP 4:
Go back to the smaller ripples or wave. Change Turquoise to White and edge the water with the following.

Row 6 (will look like Row 5): Slip Stitch into Row 1 where the original White sc are, and make a knot; ch 2, sc 1 into same stitch, sc 1 into Turquoise ros as you would for edging: sc 2 into next stitch, dc 2 into next stitch, skip 1 stitch, sc into next stitch, ch 2, dc 3 into next stitch, skip 2 stitches, sc 1 into next stitch, ch 2, dc 2 into next stitch, skip 1 stitch, sc 1 into next stitch, sc 2, hdc 2, dc 3, dc 2 in next stitch, dc 5, dc 3 into next stitch, dc 1, dc 2 into next stitch, dc 1, dc 2 into next 3 stitches, dc 3 into next stitch, hdc 1, sc 5, hdc 8, dc 1, dc 2 in next stitch, dc 5, dc 2 in next stitch, dc 5, dc 2 in next 2 stitches, dc 1, dc 2 in next 2 stitches, dc  3 in next stitch, hdc 1, sc 7, hdc 2, dc 2 in next stitch, dc 1, dc 2 in next stitch, dc 5, dc 2 in next stitch, dc 2, dc 2 in next 2 stitches, dc 3 in next stitch, sc 12, hdc 2 in next stitch, hdc 1, hdc 2 in next stitch, hdc 1, hdc 2 in next 3 stitches, hdc 2, sc 11, dc 3 in next stitch, dc 1, hdc 1 in same stitch, sc 3, hdc 1 hdc 2 in next stitch, hdc 5, sc 2, dc 3 in next stitch, skip 1 stitch, sc 1, hdc 1, sc 3, hdc 1, ch 1 to tie off.

Image

STEP 5:
Return to the larger wave, towards the front of the board.
SWITCH TO BOTH Turquoise and Light Blue, keeping the H Hook.

Row 12: Slip Stitch with BOTH yarns and tie a knot; ch 2, dc 1 in same stitch, dc 17, hdc 3, sc 5, hdc 2, dc 3, dc 2 in next stitch, dc 6, dc 2 in next stitch, dc 1, hdc 2, sc 4, hdc 1, dc 15, dc 2 in next stitch, dc 17, hdc 2, sc 4, hdc 1, dc 13, hdc 2, sc 2, hdc 2, dc 14, dc 2 in next stitch, dc 2, hdc 4, sc 6, hdc1, dc 5, hdc 1, sc 2, TURN.

Row 13: ch 1, sc 1, hdc 4, dc 2, hdc 1, sc 2, hdc 1, dc 21, hdc 1, sc 6, hdc 1, dc 7, hdc 1, sc 7, hdc 3, dc 33, hdc 1, sc 5, dc 2 in next stitch, dc 6, dc 2 in next stitch, dc 3, dc 2 in next stitch, dc 1, hdc 1, sc 4, hdc 3, dc 8, dc 2 in nest stitch, dc 4, hdc 3, sc 2, ch 1 to tie off. And TURN.

Row 14: Using only Light Blue and the H Hook: slip stitch and tie a knot. Ch 2, dc 1 into same stitch, dc 14, dc 2 into next stitch, hdc 2, sc 5, hdc 4, dc 2 in next stitch, dc 1, dc 2 in next 2 stitches, dc 1, dc 2 in next stitch, do 5, dc 2 in next stitch, dc 2, hdc 2 in next stitch, sc 6, hdc 2, dc 2, dc 2 in next stitch, dc 3, dc 2 in next stitch, dc 1, dc 2 in next stitch, dc 1, dc 2 in next 2 stitches, dc 1, dc 2 in next stitch, dc 4, dc 2 in next stitch, dc 3, dc 2 in next stitch, dc 1, dc 2 in next stitch, dc 4, dc 2 in next stitch,  hdc 7, dc 2 in next stitch, dc 3, dc 2 in next stitch, dc 1, dc 2 in next stitch, hdc 1 in same stitch, hdc 2, sc 1 in same stitch, sc 3, hdc 1, dc 1 in same stitch, dc 2, dc 2 in next stitch, dc 15, dc 2 in next stitch, hdc 2, sc 5, sc 2 in next stitch, dc 4, dc 2 in next stitch, dc 2, dc 3 in same stitch, dc 1, hdc 2, sc 5, ch 1 to tie off.

Row 15:  Start back at the nose of the large wave: count 20 stitches, slip stitch and tie a knot; ch 2, sc 1 in same stitch, hdc 7, dc 1, dc 2 in next stitch, dc 69, dc 2 in next stitch, dc 12, dc 2 in next stitch, dc 32, ch 1 to tie off.

Row 16:  Start back at the nose of the larger wave, this section will work up the middle of the wave to give some depth. Count from the knot of the start of Row 15: 17 stitches, slip stitch and tie a knot in stitch 17. Ch 2, dc 10, dc 2 in next stitch, dc 18, dc 2 in next stitch, dc 14, dc 2 in next stitch, dc 39, dc 2 in next stitch, dc 2, dc 3 in next stitch, dc 2 in next stitch, dc 1, TURN.

Row 17: ch 2, dc 3 in next stitch, dc 1, dc 2 in next stitch, dc 8, hdc 1, ch 1, dc 3 in next stitch, dc 8, hdc 3, ch 1, dc 4 in next stitch, dc 12, dc 3 in next stitch, dc 2 in next stitch, dc 1, dc 2 in next stitch, dc 2, dc 2 in next stitch, dc 2, hdc 14, ch 1, dc 4 in next stitch, dc 2 in next stitch, dc 4, hdc 1, sc 12, hdc 1, dc 4 in next stitch, dc 2 in next stitch, dc 3, hdc 1, sc 4, ch 1 to tie off.
(If you have more light blue than I do and would like to keep going with this, go for it, otherwise continue to Row 18).

Row 18: Start by going to the front of the wave by the nose of the board, slip stitch with BOTH White and Light Blue into the top of the Light Blue and Turquoise combination, Tie a knot. Ch 1, sc 1 into same stitch, sc 1 into just light blue’s dc, dc 3 into same stitch, dc 3, dc 2 in same stitch, hdc 3, dc 11, hdc 1, sc 2, hdc 1, dc 3, hdc 1, sc 5, hdc 1, dc 6, hdc 1, sc 7, hdc 1, dc 3, dc 2 in next 2 stitches, dc 3, hdc 1, sc 8, ch 1, dc 11, dc 2 in next stitch, dc 2, dc 2 in next stitch, dc 1, hdc 1, sc 10, hdc 1, dc 6, dc 2 in next stitch, dc 3, dc 2 in next 2 stitches, sc 6, hdc 1, dc 6, dc 2 in next 2 stitches, hdc 1, sc 1, hdc 1, dc 9, dc 2 in next stitch, dc 1, hdc 1, dc 13, dc 2 in next stitch, dc 3 in next stitch, sc 8, dc  13, dc 4 in next stitch, sc 1, dc 6, hdc 1, sc 6, hdc 2, dc 1, dc 2 in next stitch, dc 5, dc 2 in next stitch, dc 1, dc 2 in next stitch, hdc 1, sc 8, ch 1 to tie off.

Row 19: At this point you should have 12 smaller waves on this wave. You’ll count in from the nose’s edge to the 4th wave, or 34 stitches, slip stitch on 35, and tie a knot. Ch 1, sc 1 in same stitch, hdc 2, dc 6, dc 2 in same stitch, ch 1 to tie off.
COUNT 10 Stitches; slip stitch and knot in stitch 11, ch 1, sc 1 same stitch, sc 1, hdc 1, dc 2, dc 2 in next stitch, dc 1, dc 2 in next stitch, dc 2, ch 1 to tie off.
COUNT 14 Stitches; slip stitch an knot in stitch 15, ch 1, sc 1 in same stitch, sc 2, hdc 2, dc 4, dc 2 in next stitch, dc 1, dc 3 in next stitch, hdc 1, sc 2, ch 1 to tie off.
COUNT 16 Stitches; slip stitch and knot in stitch 17, ch 1, sc 1 in same stitch, hdc 3, dc 3, dc 2 in next stitch, dc 1, dc 2 in next 2 stitches, dc 1, sc 1, ch 1 to tie off.
COUNT 8 Stitches; slip stitch and knot in stitch 9, ch 1, sc 1 in same stitch, sc 2, hdc 2, dc 1, dc 2 in next stitch, dc 1, dc 2 in next stitch, sc 1, ch 1 to tie off.
COUNT 8 Stitches; slip stitch and knot in stitch 9, ch 1, sc 1 in same stitch, sc 2, hdc 3, dc 1 in same stitch, dc 1, dc 2 in the next stitch, dc 3 in the next stitch, sc 1, ch 1 and tie off.
COUNT 4 Stitches; slip stitch and knot in 5, ch 1, sc 1 in same stitch, hdc 2, dc  9, dc 2 in next 2 stitches, sc 1, ch 1 and tie out.
COUNT 10 Stitches;  slip stitch and knot in 11, ch 1, sc 1 in same stitch, hdc 4, dc 8, dc 2 in next 2 stitches, sc 1, ch 1 to tie off.

CHANGE Color from both Light Blue and White to just White:
Row 20: Return to the end of the board where the white edging was completed for the ripple waves. Start the White at the end of the white that already exists. Slip stitch into the last white stitch available and tie a knot. Ch 1, sc 1 into same stitch, hdc 11, hdc 2 in next 2 stitches, hdc 18, hdc 2 in next stitch, hdc 10, dc 3 in next stitch, dc 2 in next 3 stitches, dc 2, dc 2 in next 2 stitches, dc 3, hdc 2, sc 15, dc 2 in next 4 stitches, dc 3 in next 1 stitchc dc 1, dc 2 in next 2 stitches, dc 3, dc 2 in next 2 stitches, dc 3, dc 2 in next stitch, dc 1, hdc 1 in same stitch, sc 6, hdc 1, dc 3 in next stitch, dc 2 in next stitch, dc 2, dc 2 in next 2 stitches, dc 2, dc 2 in next stitch, dc 4, dc 2 in next stitch, dc 1, dc 2 in next stitch, hdc 1, sc 3, dc 2 in next stitch, dc 2, dc 2 in next stitch, dc 3 in next stitch, dc 1, dc 2 in next stitch, dc 1, dc 2 in next stitch, dc 3 in next stitch, dc 2 in next stitch, sc 10, sc 2 in next stitch, dc 2 in next stitch, dc 1, dc 2 in next stitch, dc 3 in next stitch, dc 1, dc 2 in next stitch, dc 3, dc 2 in next stitch, dc 3, hdc 2, sc 17, hdc 1, dc 1 in same stitch, dc 3 in next 2 stitches, dc 2 in next stitch, dc 1, dc 2 in next stitch, dc 1, dc 2 in next stitch, dc 8, dc 1, hdc 1 in same stitch, hdc 2, sc 12, dc 2 in next 2 stitches, dc 1, dc 3 in next stitch, dc 2 in next 2 stitches, dc 1, dc 2 in next stitch, dc 2, dc 2 in next stitch, dc1, dc 2 in next stitch, dc 1, hdc 1 in same stitch, hdc 3, sc 5, hdc 2 in next stitch, dc 1, dc 3 in next stitch, dc 2 in next 2 stitches, dc 3 in next stitch, dc 2 in next stitch, dc 1, dc 2 in next stitch, dc 3, dc 2 in next stitch, hdc 2 in next stitch, hdc 6, dc 2 in next stitch, dc 2, hdc 1 in same stitch, hdc 4, dc 2 in next 4 stitches, dc 4, dc 2 in next stitch, dc 3, hdc 3, dc 1, dc 4 in next stitch, dc 2 in next 2 stitches, dc 1, hdc 2, dc 1 in last stitch, dc 3 in next stitch, dc 2 in next 2 stitches, hdc 1, sc 5, sc 3 in next stitch, sc 2 in next stitch, hdc 2 in next stitch, sc 2, dc 1, dc 2 in next 2 stitches, dc 1, hdc 1, sc 3, dc 3 in next 2 stitches, dc 1, sc 2, ch 1 to tie off.
Image

Step 6:
Now imagine you’re on your board in the water. As you press down into the wave as it is just about to crest, you notice where the water glistens down the board. This step is ONLY if you want that extra 3D element in your board. This can also be an open ended design, it doesn’t need to be exactly like mine.

Image

The Glistening Water:
Row 1: Start at the base of the larger wave, where the edge of the water and board meet, slip stitch with White and tie a knot:

Image
You will crochet directly into the board making sure you are hooking one if not both of the front facing crochet pieces:
Image

Sc 1 in the same stitch, sc (on an angle into the board making sure not to skip any in any direction) 8;
To add a water droplet or lifted splash (chain) ch 3 (or desired amount) turn the chain so you can hdc 1 into the first stitch, hdc 1, dc 1 (etc until desired shape is complete) sc 1 attaching it to the board. Sc 13, hdc 1, sc 7, hdc 1, ch 2, hdc 1 into chain, dc 1 into board, sc 11, hdc 2 into the same stitch, sc 15, hdc 4, ch 5, hdc 3 into last ch, dc 1 into board, hdc 1, sc 14, ch 6, dc 4 into last ch, hdc 1 into next ch, sc 1 into board, sc 11, ch 5, dc 3 into last ch, hdc 2 into next ch, ch 6, hdc 3 into ch, ch 5, dc 2 into last ch, dc 3, dc 1 into last stitch, hdc 3 down original ch, sc 1 into board, sc 2, ch 5, dc 3 into last ch, hdc 3, sc 1 into board, sc 3, ch 7, dc 3 in last ch, dc 1 in next ch, ch 5, dc 3 in last ch, dc 1 in next ch, ch 8, dc 1 in last ch, dc 3 in next, dc 2 in next, dc 4, ch 4, hdc 1 in last ch, dc 4 (overlapping last dc before last ch), dc 4 (overlapping next dc), dc 2 in next stitch, dc 4 (overlapping next dc), dc 4 down the rest of the ch, sc into board, ch 10, hdc 1 into last ch, dc 4 into next ch, dc 3, sc 1 into board, ch 7, hdc 3 into last ch, dc 3 in next ch, ch 3, dc 3 into last ch, dc 3, dc 2 into next stitch, dc 2 into board, ch 3, hdc 2 into last ch, dc 2 into next stitch, hdc 1 into board, sc 8, ch 8, dc 1 into last ch, dc 3 into next ch, dc 2 into next 2 ch, dc 2, sc 1 into board, ch 8, hdc 3 in last ch, dc 2 in next 2 ch, dc 2, sc 1 into board, ch 9, hdc 1 in last ch, dc 2, dc 3 in next ch, dc 4, ch 4, hdc 1 in last ch, dc 1, dc 4 overlapping exposed dc, dc 2, dc 1 into board, hdc 2, hdc 3 in next stitch, hdc 3, dc 2 in next stitch, skip one stitch hdc 1 in next, sc 7, dc 2 in next stitch, dc 1, hdc 1, sc 22, ch 5, dc 4 in 4th ch, dc 1, sc 17, ch 1 to tie off.

Blanket is Complete! Sew in Everything.

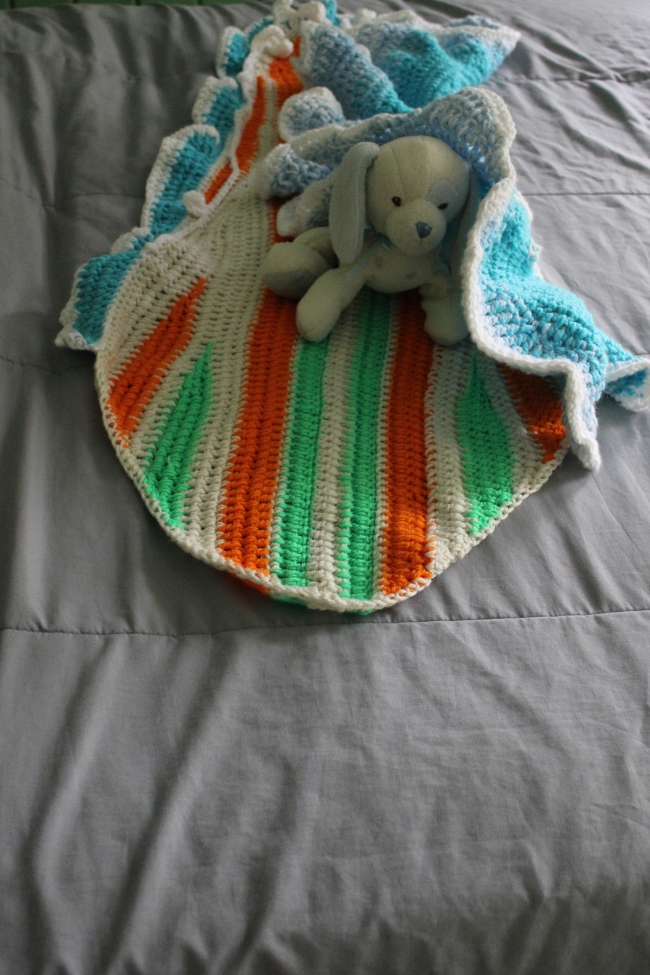
Here are a couple of shots of what it should look like when used with (stuffed animals) small children, and of complete shots without being set up.
Image

Image

Image

I like the wave for photo shoots during tummy time. I will have to post some with possibly my nephew soon.


Categories: Plentiful Designs: Free Pattern Friday | Tags: , , , , , , , , , , , , , | Leave a comment

Sneak Peak…

I can’t wait for tomorrow and finally have taken some nice pictures of this blanket finally, so I’m going to post a sneak peak in here!

I will post when the actual blanket is up in my shop if anyone is interested in purchasing.

Image

Image

Categories: Plentiful Designs: Free Pattern Friday | Tags: , , , , , , , , , , , , , , | Leave a comment

Contemplating A Double Free Friday Tomorrow

I posted earlier this morning (I think) about the other pattern I was working on and it wound up being quicker to create. Granted I am 3/4 of the way done with it aside from adding pictures to it. The thing I want to know is, would you like a double Free Pattern Friday? Or should I stay on the path I am now? It feels slightly odd to be further along than I am normally, so I figured I would ask you.

If there are no comments left, then I’ll have to gauge that as a no or that you don’t mind the wait until next week. 

Either way, I am looking forward to finding out what you think. 

Thanks blog friends! 😀

Categories: Plentiful Designs: Free Pattern Friday | Tags: , , , , , , , , , , , , | Leave a comment

I Finally Have A Moment

My son has been battling three molars on their way in and a semi-quick moving cold and I know I haven’t slept in at least three days, but I have gotten my third Free Friday Pattern finally counted out and completed. Thank goodness. It was certainly a doozy! 

In other news, I’m battling allergies of some kind, and my eyes feel like the biggest zits my face has ever encountered. Thank you sinuses! Where I would rather be trying to sleep, there is no way that I can. They burn when they’re closed and feel like zits refusing to be popped when awake. I took an Alegra D and contrary to the last time I took it, it isn’t working now, and just knocked back a Tylenol because I have no Advil. Ugh…

I have been requested to create my infamous sunflower blanket pattern for next Free Pattern Friday, so I will be getting that ready next. 

I am also trying to revamp the way my store works like I mentioned in my last post. Since being sort of under the weather, I have had to pause work towards it but will be focusing on that as well in the weeks to come. 

I am going to try resting now even if it is to just calm my nerves while my son is allowing me to. Goodnight blog.

Categories: Being Mommy/ Parenting, Random Questions, Time Management | Tags: , , , , , , , , , , , , , | Leave a comment

I’m Sorry Blog

I realize it’s a funny thing to apologize to a blog. It almost feels like I forgot my pet at a grooming salon all day long when I don’t write to you. It’s amazing really. I mean who thinks like that right? Well, in the spirit of everything I’m trying to succeed in, I do.

My son and I are muddling through allergies or so we think. Ryan has some crazy cough going and even though the doctor said he was fine for his 15 month wellness appointment. My history suggests not to trust just anyone but this doctor he saw, is very precise, takes time to really discuss all of your questions (I write them down each time so I know what I want to ask during the battle of the tears), and he’s very calm, something I have to say is helpful when trying to soothe the tantrums my son throws. All in all, especially after a nightmare related event (not today) where he had, in a freak accident, cut the tendon that attaches the upper lip to the upper gums and handled even that terrifying moment well, I think we have the right doctor. The night before, was a battle of the boogers. He spent a lot of time throwing himself around in his bed and wanting to lay in the twin bed we keep in his room, with me. Let’s just say we didn’t calm down until around 3am and slept until 6:45am. We’re all very tired now. After today’s hour filled of tears and tantrums, I’m all set. Hes fighting it now but hopefully he gets some kind of rest, even if its just 20 minutes at a time.

I did take him for a walk and lunch in a near by park with my sister-in-law and her son. I hope to keep up with all of this walking and low calorie intake just to one day get back into a pair of jeans I have. Mommy jeans serve a purpose but saggy mommy jeans are just not doing it for me. I almost feel like a male teenager with my butt pockets around my thighs. I know its not really like that, but it feels like it. While I could probably go out and buy a pair of jeans to beat the tar out of, I can’t put a value to purchasing something that I want to slim out of. I have shorts and will just have to deal until the weight comes off.

I’m almost done counting out the various stitch patterns I used in the wave to the surfing blanket too. I can almost check that off of my list of things I’m trying to do. I am also working on marking everything in my store to Free Shipping, but it will take some time. If you see something you like and it has a ship price, contact me and I will remove it for you as long as it is shipping to the USA. I will lower the cost out of the country though to the best of my ability.

Baby is up!


https://www.etsy.com/shop/PlentifulDesigns?ref=si_shop

Categories: Random Questions, Time Management | Tags: , , , , , , , , , , , | Leave a comment

I Love It When…

…I start a post and it doesn’t even save into my drafts folder, and when I tap out to another page to link a site, everything shuts off and I’m returned to the Select New Post section. Thank you iPad, you are 10 seconds from time out.

The joist of my other post was at least just starting. I was talking about my greatest thinking spots, the first being the shower and the second being the car — even when I’m busy arguing with the traffic in the passenger’s seat! I’ve tossed around some ideas while thinking about my free pattern Fridays, and decided to put up links to my blog where you can get the patterns to the particular original designs in the listings that I complete the patterns to. While, I know that the potential customer does not have to buy the item to get the pattern, I would prefer to keep the patterns free, I just want to be able to offer it with the item in the event that the individual either does not know how to crochet but wants something different OR wants to try it out on their own, they can.

I designed my shop: http://www.etsy.com/shop/PlentifulDesigns/ to be able to customize other people’s lives one step at a time, and enable them to make items that they will appreciate and are personalized to them. The point to the Free Pattern Friday’s are simply to connect with other DIY crocheters and crafters who, like me, are trying to feel great about creating something different. So I thought, why not mix the two? This will be my next step. What do you think?

Categories: Plentiful Designs: Crochet Projects, Plentiful Designs: Free Pattern Friday, Pop-Up Thoughts/ Projects, Random Questions | Tags: , , , , , , , , , , , , , , | Leave a comment

Blog at WordPress.com.