Posts Tagged With: art

Free Pattern Friday: Crochet Amigurumi Toy Horse

It’s already apparent that I’m accustomed to making projects much harder than they need to be. This crocheted pink toy horse was my very first attempt at a crocheted toy and originally, I was looking to follow a pattern out of a book. I came to terms with the fact that I just can’t be pigeon-toed into following directions. I wanted to create something similar but unique and since I recently gained yarn from my old neighbor and sister, I really didn’t have the choice of using “correct” colors for this.

20140717-144633-53193751.jpg

Supplies Needed:
Patience
Fine Yarn (3-5 colors optional)
4.0 mm hook
Yarn Needle
Stuffing

If you have a pattern for a horse head and body that you prefer, please don’t hesitate to use it and skip to the leg section of this pattern.

To Start: Select the color you are looking to work with and your hook.
Row 1: Ch 2, sc 6 in first ch, do not connect to make rows; (climb instead, rows will appear to be rows without that noticeable connection space), sc 2 onto first sc in row 1.
“Row 2” sc 2 in each of the 5 remaining sc’s from row 1, sc 1 into next one.
“Row 3” sc around making a total of 17 sc’s; the method used and count in each stitch won’t make a difference unless you load 3 or more into one stitch on the way around.
“Row 4” repeat Row 3.
“Row 5” descend in stitches from Row 4 by 2; sc 1 around 8 stitches, skip 1 stitch, sc 1 into next 8 stitches.
“Row 6” repeat Row 5. This will start making the nose more distinct.
“Row 7” repeat Row 6.
“Row 8” expand back to sc 18 stitches doubling up in the two stitches you removed in the last two rows. This will begin to build the face where the eyes will go.
“Row 9” expand to sc 20 stitches total remembering to expand by 2 sc’s in that row.
“Row 10” repeat row 9.

Stuff the head as well as you can before descending in stitches to close it up.

“Row 11” descend sc’s by 2 remembering to skip two stitches of equal distance from each other.
“Row 12” descend sc count again by 2.
“Row 13” descend sc count by 4.
“Row 14” sc 9.
“Row 15” sc 5.

Stuff more into the head. I found that by stuffing with the hook’s end and swirling the stuffing around helped get more into the head than closing it without the additional stuffing.
“Row 16” sc 2, making sure to ch 1 additional, pull through and tie off.

Your horses head is complete.

Next starting from what should be considered the end of the jaw or “Row 10” create an oval lining up with the back of the head. Mine shows sc 10 stitches around.
“Row 17” sc 14, adding sc 2 in the front and back of the neck, this will begin to build the chest and back of the head where the mane will go.
“Row 18” sc 18, adding 2 sc 2’s in the front and back of the neck in the similar location as the additional 2 stitches in row 17.
“Row 19” sc 20 only adding 3 sc 2’s in the front in the same region as the previous rows in the chest. You should notice the build up in the front take on a shapely round curve in the front and a stumpy area in the back.
Repeat row 19 for “Rows 20 -22”

Stuff the chest enough to be able to hold the chest and work on the remainder of the body.

“Row 23” sc 26 around, repeat this for “Rows 24-27”
“Row 28” sc 22 skipping 4 stitches around. The particular order does not matter so long as the four stitches that will be skipped are not all in a row.

Stuff the chest some more, as much as you can without fully extending the sc stitches that have already been made to expose the stuffing. You will know when you have stuffed it too much. Remove any extra stuffing that may have exposed these areas.

“Row 29” sc 18, skipping 4 stitches around, similar to row 28.
“Row 30” sc 12, skipping 6 stitches around.
“Row 31” sc 8, skipping 4 stitches around.

Stuff any additional stuffing if you find you need more to shape the chest.

“Row 32” sc 5, skipping 3 stitches around.
“Row 33” sc 2, skipping 3, ch 1 to tie off.

The chest is now finished.

Start the back and stomach by picking a spot on the back of the neck to start the body. I went about half way down the back and started there and made sure to build the body by making an oval as close as I could to a circle in the first round of stitches. Please keep in mind this is harder than it looks when any of the body parts are stuffed.

“Row 34” slip stitch into the middle of the back and tie a knot. Sc 19 all the way around towards the base of the chest and back to the back.
“Row 35” repeat the same 19 stitches.
“Row 36” sc 24 adding sc 2’s in the stomach area to expand the oval into a circle on the right and left of the horse’s stomach.
“Row 37” sc 28 adding sc 2’s again in the stomach area.
“Row 38” sc 28 around in the next four rows: “Row 39-42”.
“Row 43” sc 24 descending in stitches in 4 stitches even from each other.
“Row 44” sc 20, descending in stitches in 4 stitches even from each other.
“Row 45” sc 16 descending in stitches in 4 stitches even from each other.

Stuff the stomach. This will show you how to close the stomach. It’s better to have a rounded end as this helps the height in the rump area.

“Row 46” sc 12 descending in stitches in 4 stitches even from each other.
“Row 47” sc 8 descending in stitches in 4 stitches even from each other.
“Row 48” sc 5 descending in stitches in 3 stitches even from each other.
“Row 49” sc 2 descending in stitches in 3 stitches even from each other, ch 1 to tie off.

This ends the stomach.

Next is the rump. I designed this horse to be similar to real life ones with all of their curves so the rump will rest higher than the highest point in the back by a couple of stitches and roughly the same at the belly. To achieve this start the stitching at the “Row 38”.

“Row 50” slip stitch into “Row 38” and tie a knot. This has to be stitched as a circle, flesh it out with extra sc stitches if you need to, to make it round. I used sc 26.
“Row 51” sc 34 all the way around expanding primarily in the top of the rear adding sc 2 every other stitch.
“Row 52” sc 34, repeat in the next 4 rows: “Row 53-56”
“Row 57” sc 28, descending in stitches in 6 stitches even from each other.
“Row 58” sc 20, descending in stitches by 8 stitches even from each other.
“Row 59” sc 14 descending in stitches by 6 stitches even from each other.

Stuff the Rump.

“Row 60” sc 12, descending in stitches by 2 stitches even from each other.
“Row 61” sc 8, descending in stitches by 4 stitches even from each other.
“Row 62” sc 5, descending in stitches by 5 stitches even from each other.
“Row 63” sc 2, descending in stitches by 3 stitches even from each other, ch 1, pull through to tie off.

The legs…were the most annoying part of all of this because it’s a tiny space to work in.

crochethorse3

Each of the legs consisted of four closely crocheted ovals as bases, their positions are entirely up to you. I am going to explain the creation of the thigh, calf and hoof to one leg. As the front were more irritating than the back, I’ll explain the front.

To start the thigh, slip stitch onto the side that you would like to build it onto first. I’d suggest starting at the top of the oval and working your way around.
Sc 2 into one stitch, sc 4, curve by sc 2 into next 1 stitch, sc 4 and connect to first sc. Continue first row exactly the same way 4 times. Stuff. This will be difficult. I used the end of my hook, stuffed and swirled it around until it packed the thigh enough to work on closing it.
Sc 8 around descending by 2 stitches equally from each other.
Sc 4 around descending by 4 stitches equally from each other.
Sc 2 around descending by 2 stitches equally from each other, ch 1, pull through to tie off.

Create the calf muscle by recreating the same oval on the back side of the thigh.
Sc 2 into one stitch, sc 4 curve the oval by sc 2 into the next 1 stitch, sc 4 and connect to first sc.
The calf muscle generally gets smaller towards the hoof in pictures of horses, the next row will descend in stitches to achieve this.
Sc 8 around descending in stitches by 4 equally from each other.
Repeat Sc 8 in next 5 rows, last row will ch 1 to tie off.

Stuff calf muscle up to the rim and select hoof color.
Sc 8 for next 3 rows.
Sc 5 descending in stitches by 3 stitches equally from each other.

Stuff the hoof too before closing the leg up.
Sc 2 descending in stitches by 3 stitches equally from each other, ch 1 to tie off.

The trick to the legs are simple once you thing about it. You will need to create halves of legs to get the bend correct. Keep in mind that it’s very important to make sure that every leg is proportionately correct or the design will be flawed and your horse will not stand up.

The tail.
Building the tail is similar to the neck. You will slip stitch and crochet a circle a little higher than the middle of the rear-end, which is where its located on a regular horse, sc 6 stitches around.
Repeat the sc 6 in the next row.
You will start building an oval which will build the lower area of the tail.
Sc 3, sc 3 in one stitch, sc 3.
Sc 4, sc 3 in same area as the 3 stitches above, sc 4.
Sc 4, sc 3 in same stitch, sc 2 in next stitch, sc 2 in next stitch, sc 2 in next stitch, sc 2.
Sc 2 in every stitch for this row and the next two rows.

Stuff the Tail.

On one side, sc through both sides of the tail closing the gap between them.
Ch 2, dc 2 into both sides (do this by pinching both sides together and going through two open stitches one on close to you and the other farther from you) do the same dc 3 in the next stitch, sc 1 in next stitch to create a ruffle; ch 2, dc 5 into next stitch attaching front and back as described before, sc 1 in next stitch; ch 2, dc 5 into next stitches, sc 1; ch 2, dc 5 in next stitches, sc 1, ch 1 to tie off, leave slack to sew in and excessively sew the area you just stitched up in case you missed anything.

The mane is up to you, but this is what I did.

To achieve this look, start from the center of the top of the head and sc one line down the middle of the back of the neck ending at the base of the shoulder area and turn.
ch 2, dc up the way you came, until the second to last stitch, these will be hdc 1, and sc 1, Turn.
ch 1, skip one stitch,  sc on the way back down, turn.
– ch 1 and use the dc 5 to sc 1 pattern for the scalloped design found in the tail. Once finished, ch 1, tie off and sew in.

Add the ears directly on the head.
Slip Stitch and tie a knot where you would like the first ear to be.
Sc 3 into same stitch, Turn.
Ch 1, hdc 1 into first stitch, sc 3, ch 1 to tie off. This should make a triangle.

Repeat this on the other side of the head where you would like the other ear to be.

For the facial features you are more than welcome to create a bottom lip.
This is going to simply be a sc line across the bottom of the nose, out only maybe two or three rows. I didn’t decide to do that though but it is easily the simplest part of this whole design.

Otherwise, sew in the eyes, nose and mouth with a yarn color of your choosing.

Sew in remaining areas and you’re done!

crochethorse4 

Categories: Art Portfolio, Plentiful Designs: Crochet Projects, Plentiful Designs: Free Pattern Friday | Tags: , , , , , , , , , , , , , , , | Leave a comment

My Art Has A Meaning: Sleepwalker

sleepwalker

Title: “Sleepwalker”
Medium: Digital Painting/ Collage
School of Art: Fantasy
Original Size: 8″x8″
Creation Date: 2009

This has an original statement but before I share it, I’d like to add that I was a sleepwalker at one point in my life. My father does it too but he’s a terror to be around while he’s doing it. Some are violent and stressful episodes chasing my brother into the bathroom or pinning your feet like a wild animal while you were asleep in your own room and others are confused moments where he would talk about losing fingers or making sure his biking shorts weren’t too small, (they’re always going to be too small Dad). My father’s sleep walking episodes far exceed my own. Mine stopped after a sleep over at my cousins house while she still lived near us but this digital painting was done in response to how we can move without knowing it.

Original Description:
Sometimes the most destructive things are astonishingly beautiful. I used a limited pallet for this making sure I used the photograph to its fullest potential. The movement in the clouds effect her dress and the movement of her body, as though she was a puppet to her slumber. The tightness in the torso embodies the completeness of the storm. The powerful spin seems effortless as she is unharmed, unshaken from the destruction.

Categories: Art Portfolio | Tags: , , , , , , , , , , | Leave a comment

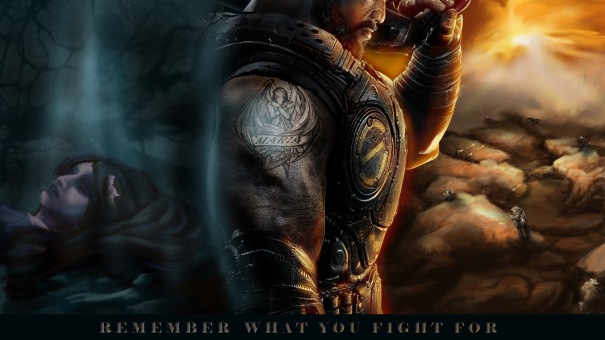
My Art Has A Meaning: Contest Enrty – Remember What You Fight For

remember_what_you_fight_for_by_meok-d4asq1d

Title: “Contest Entry – Remember What You Fight For”
Medium: Digital Painting/ Collage
School of Art: Fantasy
Original Size: 24″x 12″
Creation Date: 2011

This also came with a description written when it was submitted for review for the “Gears of War 3 Contest” hosted by DeviantArt.com in 2011.

Original Description:
This piece was not my first thought. In fact, I had a completely different piece being processed in my mind. I must have spent about a week trying to wrap my mind around this game versus the project. I’ll be brutally honest…I am prone to nightmares, especially after Zachary died. Starting this piece with sketches and retaining knowledge about this game, I started seeing my night terrors before they happened. I decided this needed to be done and quickly.

I read about Maria and Dom’s story instead of picking up or prodding my husband to play Gears Of War since shooting games, blood and gore, amplify my nightmares. I related to their depression after losing their children after E-Day and wanted to depict something I know all too well…suffering and the near comfort of looming death. It’s nearly been a year and a half since my little boy passed, my body has been beaten and I am eternally tired. I tried to emphasize those thoughts when I painted Maria. A tranquil blue light signifies a memory and the hopeful presence of peace. Dominic’s tattoo prompted me to look up the significance. I put him in the middle of the two worlds. Mourning the loss of his wife and children, and pressing on to win the war.

The title, “Remember What You Fight For” should be self-explanatory.

This piece, aside from prep time, took 48 hours to complete.


Categories: Art Portfolio | Tags: , , , , , , , , , , , | Leave a comment

My Art Has A Meaning: Contest Entry – The Bulb & The Blight

thebulb_n_blight

Title: “Contest Entry – The Bulb & The Blight”
Medium: Digital Painting
School of Art: Fantasy
Original Size: 8.5″x11″
Creation Date: 2011

This was done entirely in Photoshop with the mouse which blows my mind now because I cannot stand using it. This also came with a description written when it was submitted for review for the “RIFT Create A Colossal Contest” hosted by DeviantArt.com in 2011. While it is an older piece with older views, I still love the way that the upper background is done with the white dove soaring through the light cascading from the trees. That along with noticing that this was all done with the mouse instead of the tablet was another reason I had to post it.

Original Description:

After playing several MMO’s and having my share of battles as all sorts of classes, I felt that I had seen it all. When this contest came around I thought back to all of the strategies and expectations of faulty or amazing group members and found myself remembering that I hadn’t seen a boss you had to kill with kindness.

This boss has two sides to it. The obvious boss with a slew of minions to take care of and also the generous one willing to buff you if you heal it. Now I haven’t played Rift yet but it is on my list of games to play when I can muster up some time for myself. However I did do my homework and watched multiple videos that displayed the way that the rifts open and the baddies that came with them.
I chose to do the life rift. Let’s say the rift opens from the sky and spits out a giant bulb. The bulb is the boss. Each time its planted it has some sort of deformity, in this case blight, in others it could just be weak from the landing, (who knows) I figure it opens up imagination and problem solving on the fly. As the blight tries to take over and make a super colossus, the bulb is dying. So there would be two boss bars to watch. If the super colossus kills the bulb its game over. The bulb must prevail.

The more the bulb is healed and the higher health points it receives it starts growing new chutes that generate new plants that give random buffs as they open. Once the bulb is completely healed it regenerates new life in the infected area and turns back into the closed bulb it once was. After that I figure it would disintegrate and bless everyone in the surrounding area with a greater buff that say could last all day or something. I hadn’t thought about an end result.
This piece took on many forms during this whole process. This is certainly not the creature I had drawn up to begin with. In fact my whole thought process originally stemmed from a mother nature scenario that they formed into a creature that I imagined as older since I couldn’t imaging mother nature being entirely young anymore since the Earth is… well how old? Not to mention many games are based on the place we call home, surrounded by new forms and mutations of sorts. Anyhow eventually out of frustration I scrapped the drawn version of this and remade the bulb creature. I had been so involved with this colossus being able to regenerate life that I had surprised myself when I reread the contest requirements. It needed to be a boss…hard and awesome. I thought about setting it aside and working on another one but I put so much of myself into it… so much thought and determination, that it bothered me to make that commitment to another piece. I thought about it and Blight was added. Blight is this frightening creature that surrounds the Bulb; I designed it to surround the Bulb and have this dark-non-figurative-chiseled yet blob typed mass to it.

Categories: Art Portfolio | Tags: , , , , , , , , , , , , , | Leave a comment

My Art Has A Meaning: A Little Bit Lost

a littlebitlost

Title: “A Little Bit Lost”
Medium: Digital Painting
School of Art: Fantasy
Original Size: 8″x10″
Creation Date: 2011

“A Little Bit Lost” was actually an experiment with light bending and background illumination and then it became something a little more interesting than a doodle. The shattered light through the trees became a gateway into inner reflections of myself. Since I had completed quite a few pieces on the pain of losing my son Zachary back then, I decided to depict the “subject” as a frightened and indecisive innocent horse with a double shadow. The double shadow could be from the light bending or it could be more from the doubts and confusion as to where it is versus where it is going.

Categories: Art Portfolio, Uncategorized | Tags: , , , , , , , , , | Leave a comment

My Art Has A Meaning: Still Life – Single Shell

shell_logo

Title: “Still Life – Singe Shell”
Medium: Digital Painting
School of Art: Realism
Original Size: 5″x7″
Creation Date: 8/17/2012

This still life was actually created as an original acrylic painting on canvas board that I had enhanced in Photoshop since I felt the colors in the original were flat. I liked the idea of giving it an illumination glow with more oranges and peachy low lights as this was a way for me to reconnect with the light I love to find at the beach. Just because I was no where near the shore, doesn’t mean that I couldn’t recreate it’s summer beauty here. The way the shell glistens reminds me of the sparkling water crests under the golden sun. The cool navy blue background is flat to signify singularity. The shell is grounded by not being centered, and this helps exaggerate a constant reminder of imperfection.


Categories: Art Portfolio | Tags: , , , , , , , , , | Leave a comment

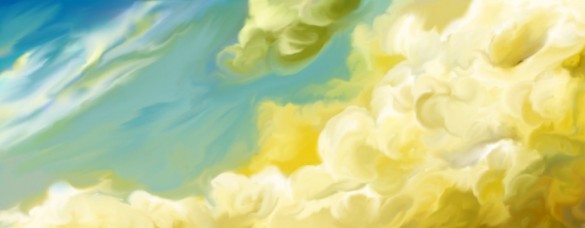
My Art Has A Meaning: Freedom

cropped-style-1-clouds.jpg

Title: “Freedom”
Medium: Digital Painting
School of Art: Realism
Original Size: 3.5″x1″
Creation Date: 5/27/2012

Like the majority of my work in Photoshop, this started as a doodle and instantly became freeing. Digital paintings that help me feel like I am flying are the most freeing of all. There’s nothing quite like feeling the atmosphere lift you while you’re designing clouds in the sky. 


Categories: Art Portfolio | Tags: , , , , , , , , , , , , | Leave a comment

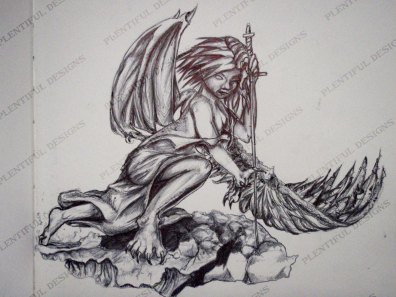
My Art Has Meaning: Let Go

Title: “Let Go”
Medium: Black Ink (Pen) on Paper
School of Art: Fantasy
Original Size: 8″x8″
Creation Date: 2005

letgoink
I’ve always had a thing about the cliche angelic and demonic side of an individual, and displaying it was equally difficult. I would have these bottled up fits of explosive silent rage when people would judge what they couldn’t understand, that I wanted to show in a work of art. At the time, pencil was not good enough for me, and pen was basically the only tool around worth drawing with. I liked the idea that I couldn’t go back and “fix it”. The chaos of the pen strokes, both deliberate and not made the statement that I was looking for.

On the right with the closed and raised wing is the demon clenching the stone beneath her with her claws and reaching out forward while flexing her muscles and ripping through the angelic robe constraints. The left shows the angel letting go and collapsing on her sword. While she is falling her wing is outstretched toward the ground and she is sliding on the stone making dust off of the gnarly, ridged terrain.

Back when this was created, I was experiencing tough times with my family, the looming decision of school in terms of what I wanted for myself, and what my parents wanted for me, as well as every last thing a young adult goes through in terms of relationships, work, and the stress of not knowing yourself enough to stand alone.

In 2009, I had some skills in Photoshop from an internship that lasted a few years, and decided after failing so many times in so many other medias, including, metal, casting, ceramics, fiberglass, and even lithographing, it was time to try my hand in altering it in Photoshop. I colored it as you can see below, and while it isn’t my favorite, I wanted to show the success of the first piece and the aged failure of the second. At the time I liked it because it came closer than the other medias, but now I can see the flaws and know that it will be redone again. I did take some artistic licensing to recreate the torn and opened wing as this enraged demonic figure has been in battle multiple times, but I don’t know if that was a great decision back then or now.
Let GoPSD

Please know that these works do exclusively belong to me and have been copyrighted. If you are interested in using them for something please contact me first and I will work with you.

Thanks!

Categories: Art Portfolio | Tags: , , , , , , , , , , , | Leave a comment

Too Much

I legitimately have too much on my plate but it’s my own fault as I am the one that puts it there. Is it considered a fault to be too motivated?

My feet are tingling right now since I have finally gotten up the nerve to sit down and “rest”. Driving this morning didn’t count and I’ll explain why. When you’re driving, you’re not sitting and relaxing, there’s always a constant motion, therefore, it’s not relaxing. My feet feel like they have been pounding the pavement for five years and its only been the last 48 hours that I’ve felt like this.

Let my back track to my first statement. I’m not sure if I’ve already posted on trying to get my husband applied to college, but that was something that needed to be done and over with, oh, I don’t know, last month, when we first started the application. It had been procrastinated about so much that last week, even after I helped him with everything, I gave up. I wasn’t going to bring it up anymore because this was a cycle that he had been doing with me for as long as I knew him. He fluctuates between two avenues, only to stick to the path that is the most “comfortable”. I love him, but I don’t love that at all and after being emotionally exhausted after trying to get him moving this last time… I burned out. 

I started focusing on myself, which basically means, Ryan first then myself. Ryan is cutting seven teeth at once and is a little bit of a terror. He shifts from insanely happy to a ravenous psychopath in an instant. Last night he refused to sleep. It took three hours of cuddling for him to go to bed. The bed to crib transfer was a success until 15 minutes later where he wanted up and to come back. Musical beds lasted all night with complementary screaming matches and medicine to try to take the edge off. It didn’t help. No, instead it aggravated him more and he showed it. 

This morning I had enough. He got up and so did I but I put him in his crib, grabbed his monitor and took 6 paces out the door and 6 more into the garage. I retrieved my sewing machine, after checking for spiders, since the garage is where the rebel base is. I couldn’t deal with more intruders after I spent the weeks before, killing on 3 average, after finding them breaking in and entering. I sprayed Raid the day before all around every last door, window, part of the garage, and the wooden, open stairs by the back doors. When I closed the garage door with my clean container in hand, one of those quick, thick black spiders with the white stripe down its back ran for the garage. I stopped and gave it a chance. If it comes in I have a special place for it’s carcass. Those spiders are the worst. They don’t build webs, they’re more like animals. They WATCH you. I had a monster sized one in the house and I kid you not, it freaking watched where I was in relevance to where it was planning on going. I honestly don’t give a shit if it doesn’t bite. I will kill it if it comes in. Since I sprayed I haven’t seen any intruders, so I tipped my imaginary hat and slammed the garage door down.

Ryan was going in and out of sleepy time and could have go to sleep had I not slammed the garage door and had a bigger bottle in the crib with him but, duty calls. At this point, its 6:30am, hes out in the living room, I have already cursed at technology (the WiiU and PS3) because I needed to set Ryan up with the musical movie pacifier, Frozen, and couldn’t because the wires were switched. I realize that those of you reading this might say, “why is this an issue?” Here’s my issue. I see all of the consoles as something my husband owns. I just recently figured out how to use the PS3; don’t judge me. I have already had the issue of “messing with his stuff talk” that I don’t want to live through again so I simply don’t mess with it. I guess you can tell what happened next. I didn’t play the movie! 

Instead, I put on the news, something I don’t get to watch usually. I was concerned with the weather and a task I knew that I had to complete, so I let it run and run and so forth until I finally heard it at 7:30. Between the time that I put the news on and then, I had set Ryan up to eat, he pulled some nonsense about not wanting to eat what he was getting so, he got a hand full of Cheerios! Have a great day! While he was eating, I set up the sewing machine, and pinned up the pieces of cloth that I had purchased with him for his curtains, thinking today would be a rainy day, and I wouldn’t be able to get out. Apparently terrible thunderstorms are coming later today, not when they originally suggested they might. At this rate, they may as well cut the funding in the station for weather technology since they are correct about 20 percent of the time. Regardless, I designed, sewed, and hung his new curtains. It’s on a tiny window in his room, but he’s been getting up as soon as the light peaks in his window, so I am trying to block it with a thicker curtain. Of course, buying it would have been a $50 or more nightmare, but purchasing it, and doing it myself cost well under $20 to complete. I’ll take the second, thank you!

Now that it had been completed and hung, I could then go and pack Ryan’s bag, bring snack, make a cup for him, and get together the rest of my husband’s application, the checkbook, a pen, and remembered to get dressed to go out to deliver it to their admissions department. Going back to school for me was a cake walk, aside from my screaming, borderline tantruming, teething baby in car seat. I eventually figured out that he wanted his toddler’s music CD on in the car instead of the radio, on the return trip. I didn’t know that it was the issue going, so that was a pleasant half hour. When we got there, Montclair State really got a face lift since I graduated in 2008. The admissions department moved to College Hall, and where it was turned into a Psychology screening building. College Hall itself, lost the parking in the circle that used to be in behind it to a garden and large sidewalk…and I found all of this out after I walked all the way down there to ask where the new office was. Great. At least, I wasn’t parked in one of those far lots. No, no, instead I bit the bullet and used the parking garage, which must have gotten a facelift too since I don’t remember it going past five levels.

By the time I got into College Hall, I had used a side door and figured out how to drive the jogging stroller like a pro, wheeling it through the door without anyone’s help, and holding the door myself. Ryan just about had enough of me today since he didn’t sleep last night and decided to throw a fit when he stopped moving, which was just fantastic while I asked about times on when I should be looking for a decision letter in the mail. Since I delivered everything to them, they said it should be 2-3 weeks from tomorrow, to hear from them. I’ll take that! I was helped out the side door and we were on our way to pay the parking deck, and get out. Thankfully it took under an hour to complete and I didnt have to pay.

On the way home I was wise to Ryan’s needs, gave him his milk, some cheese doodles, played his CD and out he went! It was short-lived though when I noticed how hard it actually was going  to be to get him into the house from his floppy nap position. I had put him down only for him to notice where he was and start yelling at me again. Now, at this time, I dont know what else to do, so I set him up with some toys and decided that I would try to clean up a little bit. I had started a scrapbook for everyone and a family scrapbook that I wanted to kind of add to as we went along. I decided to do that with him since he likes to “help” me. And then began the flip outs. I gave him lunch, and he wanted some of my pot-pie too, just to go back to his sweet potatoes. He started playing a game with me where I would scoop some potatoes, he would stick his finger in it on the spoon, and then I would put the rest in his mouth and he would laugh at me. So I would say, ” ‘tatoes, touch it, mmm potatoes,” and he would belly laugh while he ate it. It was really cute!

Oh, I also blew a fuse today in our apartment. That was fun. I had to put him in his room and bring the monitor again, but of course the monitor is plugged into the same circuit as everything that blew so I tried seeing if GG could just come in by him. That didn’t happen. So I just ran down there, took care of it and went right back to him. The basement door is miserable. It doesn’t close for anything and the last thing I want is a creature from down there coming up into the apartment.  Once everything was done and restarted, I grabbed him and let him play again.

Later, he pooped, oh do we think poopies are funny? Yes WE DO! He laughs at me that I say the word, he tries to get away and thats funny, all the way until I situate him and change the diaper, then, and only then, is it not funny. I have found myself saying, “you can’t keep the poop”. Why do I need to say that? He went for another round of crazy and went down just before. Thank the Lord, Ryan went to sleep!

Now, I have a slew of things I want to do, which includes start posting at least one piece of my portfolio and works that I have done in the past while I was learning in school, almost to give an idea of who I am and what I have done as an artist in the past and where I look to be going in the future. I would like a shower since I was in the basement, I would also like to continue writing about my son’s story and trying to catch up to now. I last stopped when I was starting to talk about our visit to Sunset Beach, North Carolina last August. I’d like to catch up so that I can put daily entries in and have it printed for him when he graduates eighth grade and starts having all of these teenager questions about his existence, like all teens do. But, a shower takes the first slot as, hes ASLEEP, and I can post after a shower. I’ll have to find something from years ago to post. I wonder what I will find!

Categories: Time Management | Tags: , , , , , , , , , , , , | Leave a comment

Blog at WordPress.com.