
I’ve already started working on the pattern for Free Pattern Friday’s crochet design that I’m currently in the process of finishing too. It’s a tough one because I do not have a simple mind. I’m looking forward to adding it this Friday and cant wait to see your reactions to this one!
Posts Tagged With: free pattern
Free Pattern Friday Will Be A Doozy!
Categories: Art Portfolio, Plentiful Designs: Crochet Projects, Pop-Up Thoughts/ Projects
Tags: baby gifts, baby girl gifts, baby toys, coming soon to Plentiful Design's Etsy Shop, crochet baby toys, crochet designs, crochet toys, custom art, custom artowrk, designs need patience, fantasy, free, free crochet desings, free pattern, hard designs, horse, horses, pink, plentiful designs, toys
Leave a comment
Free Pattern Friday: Extra Soft “Lamby” Blanket
Free Pattern Friday: Sewing A Fleece Animal Blanket

I made this for my son. The layered lamb’s body provides extra warmth and comfort.
Supplies Needed
Patience
Sewing Machine or Hands
Needle & Thread
Pins
Scrap cloth or anti-pill fleece: 1 yard white, 1 yard blue or another color
Felt: 1 piece black or another color
My son loves this blanket and it inspired me to even create another one that I will post another time. When he is ready to go to sleep or is acting tired, I ask him if he wants to go see Lamby and if he’s really tired he will get up and excitedly go towards his room. Lamby makes bedtime so much easier.
Procedure:
1. Select the materials you would like to work with. If you have a ton of scraps, feel free to use them here. If you are looking to make Lamby as is, then get your fabric as listed above.
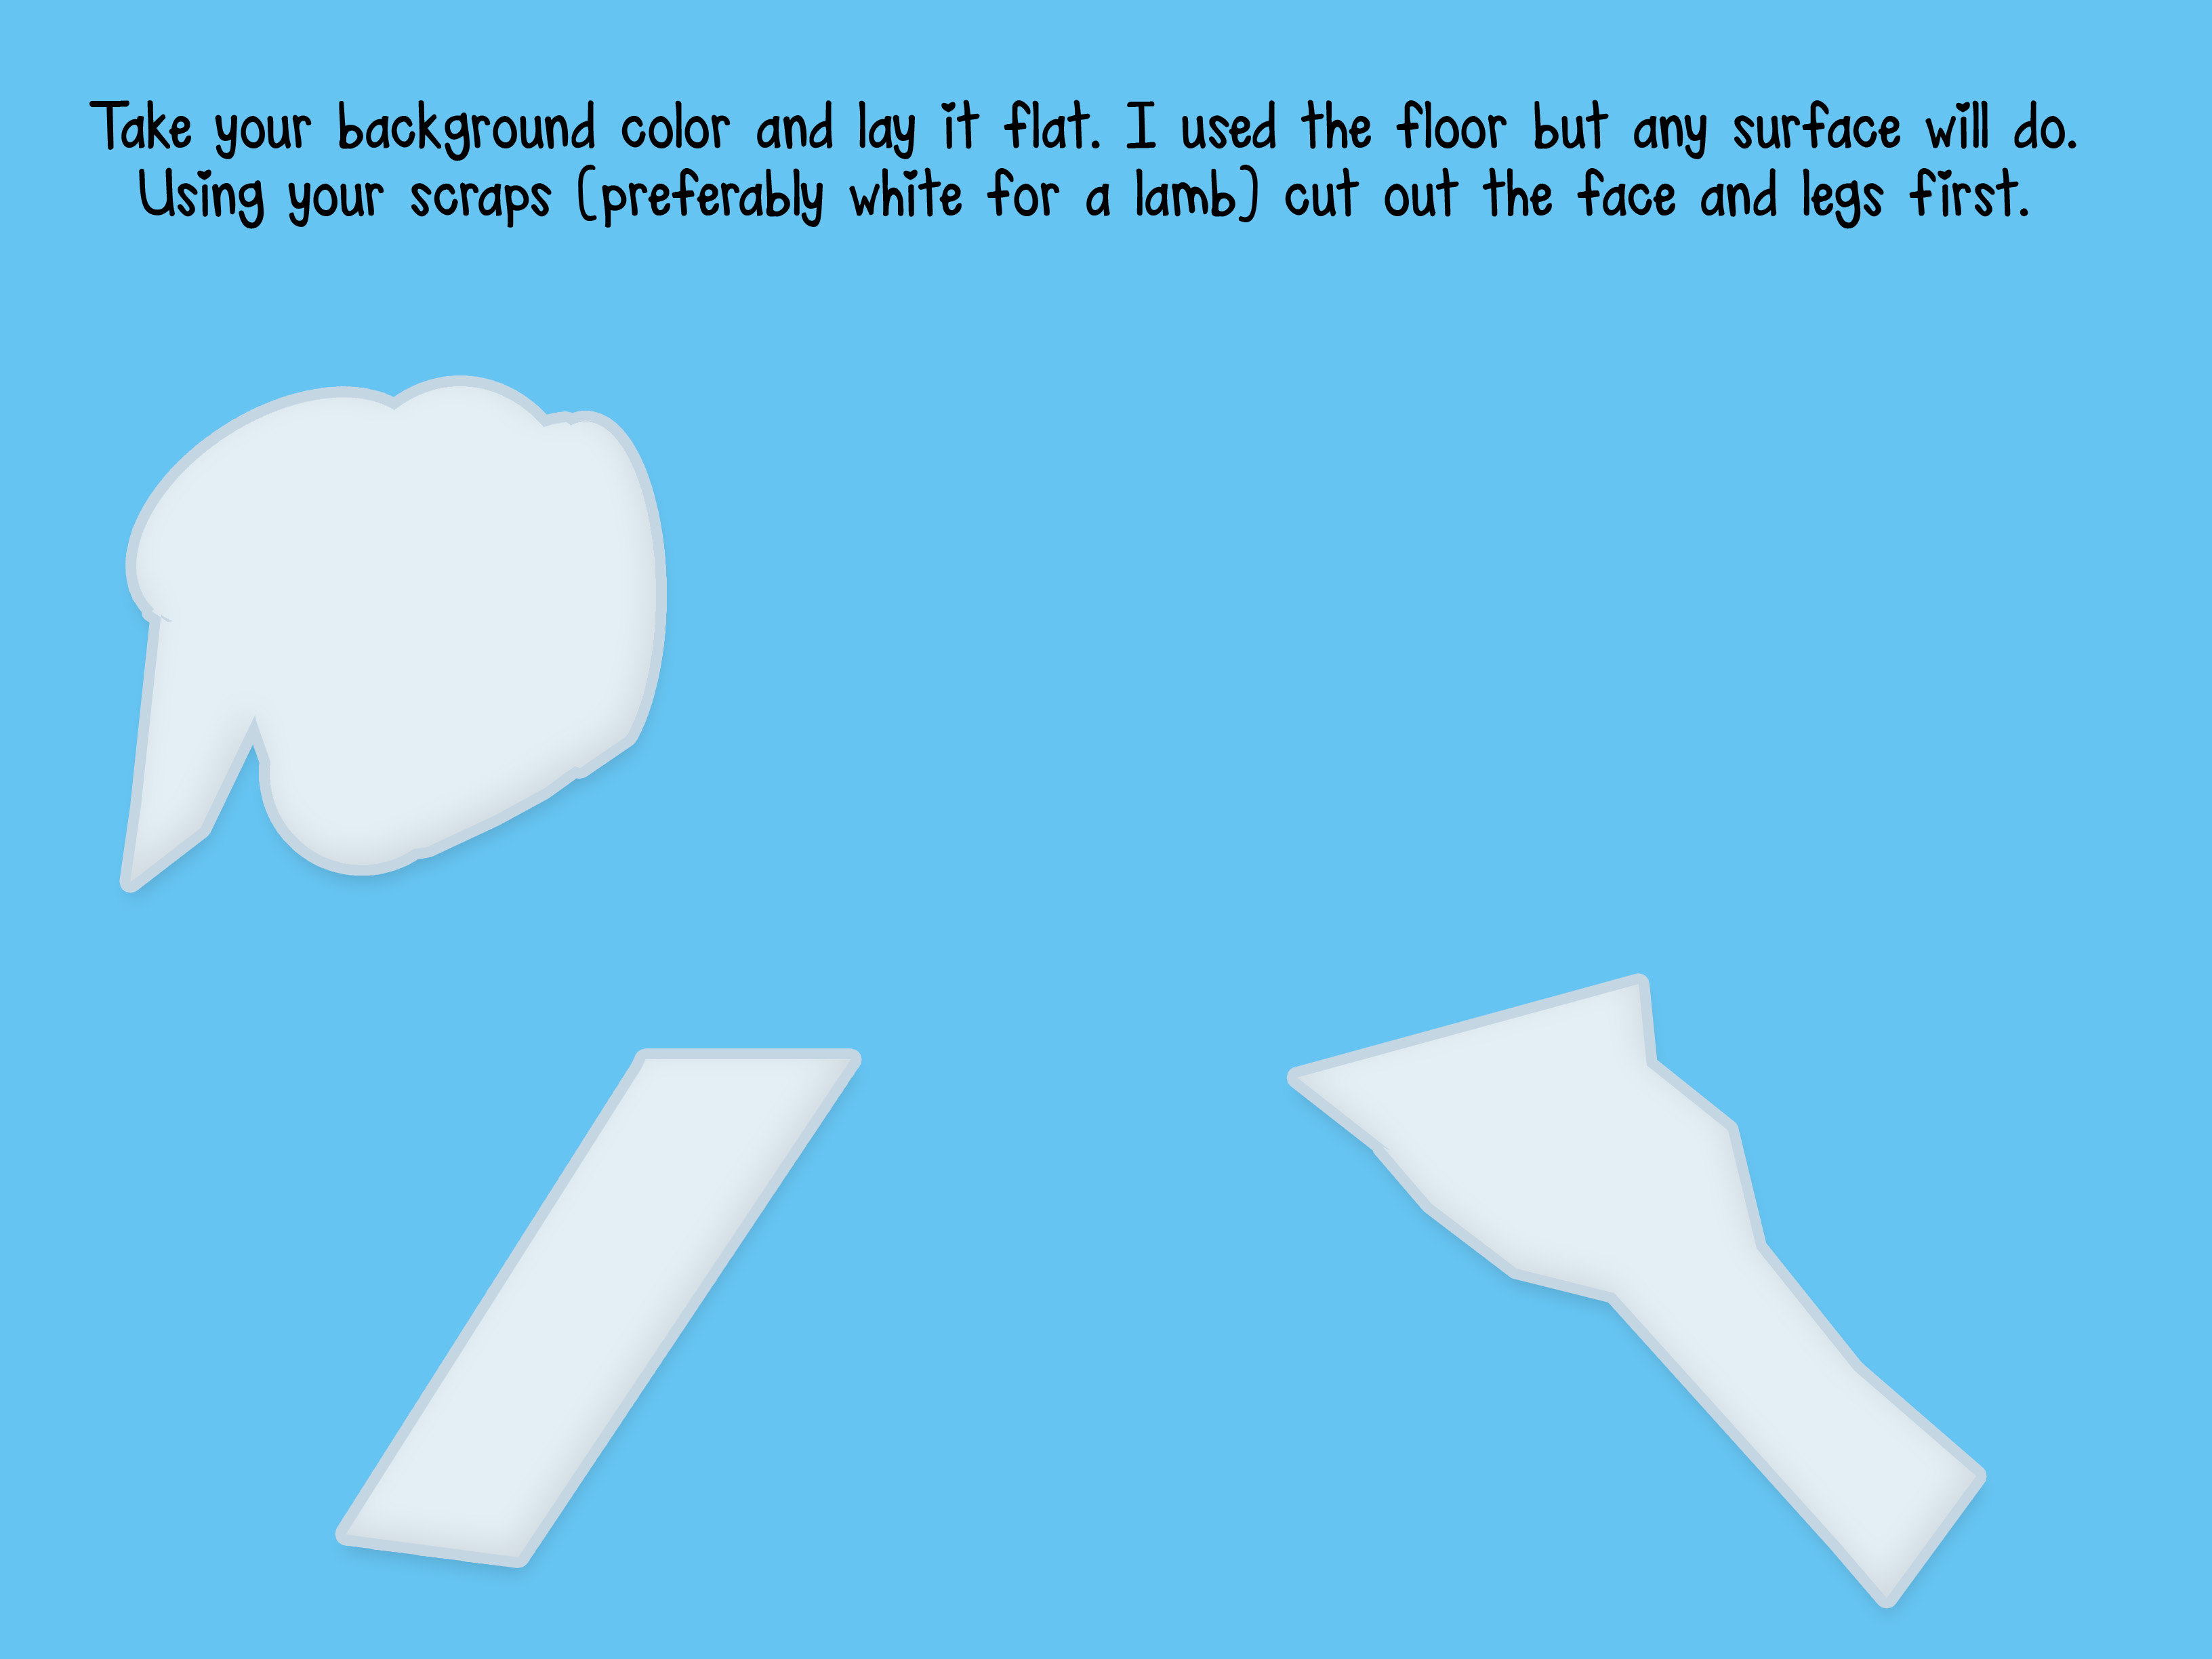
2. Take your background color and lay it flat. I used the floor but any surface will do. Using your scraps or your white anti-pill fleece (preferably white for a lamb) cut out the face and legs first.
3. Next, cut out a “poof” for the tuft of wool above your lambs head, and cut out the other ear at the same length you did the first (the one attached to the head).
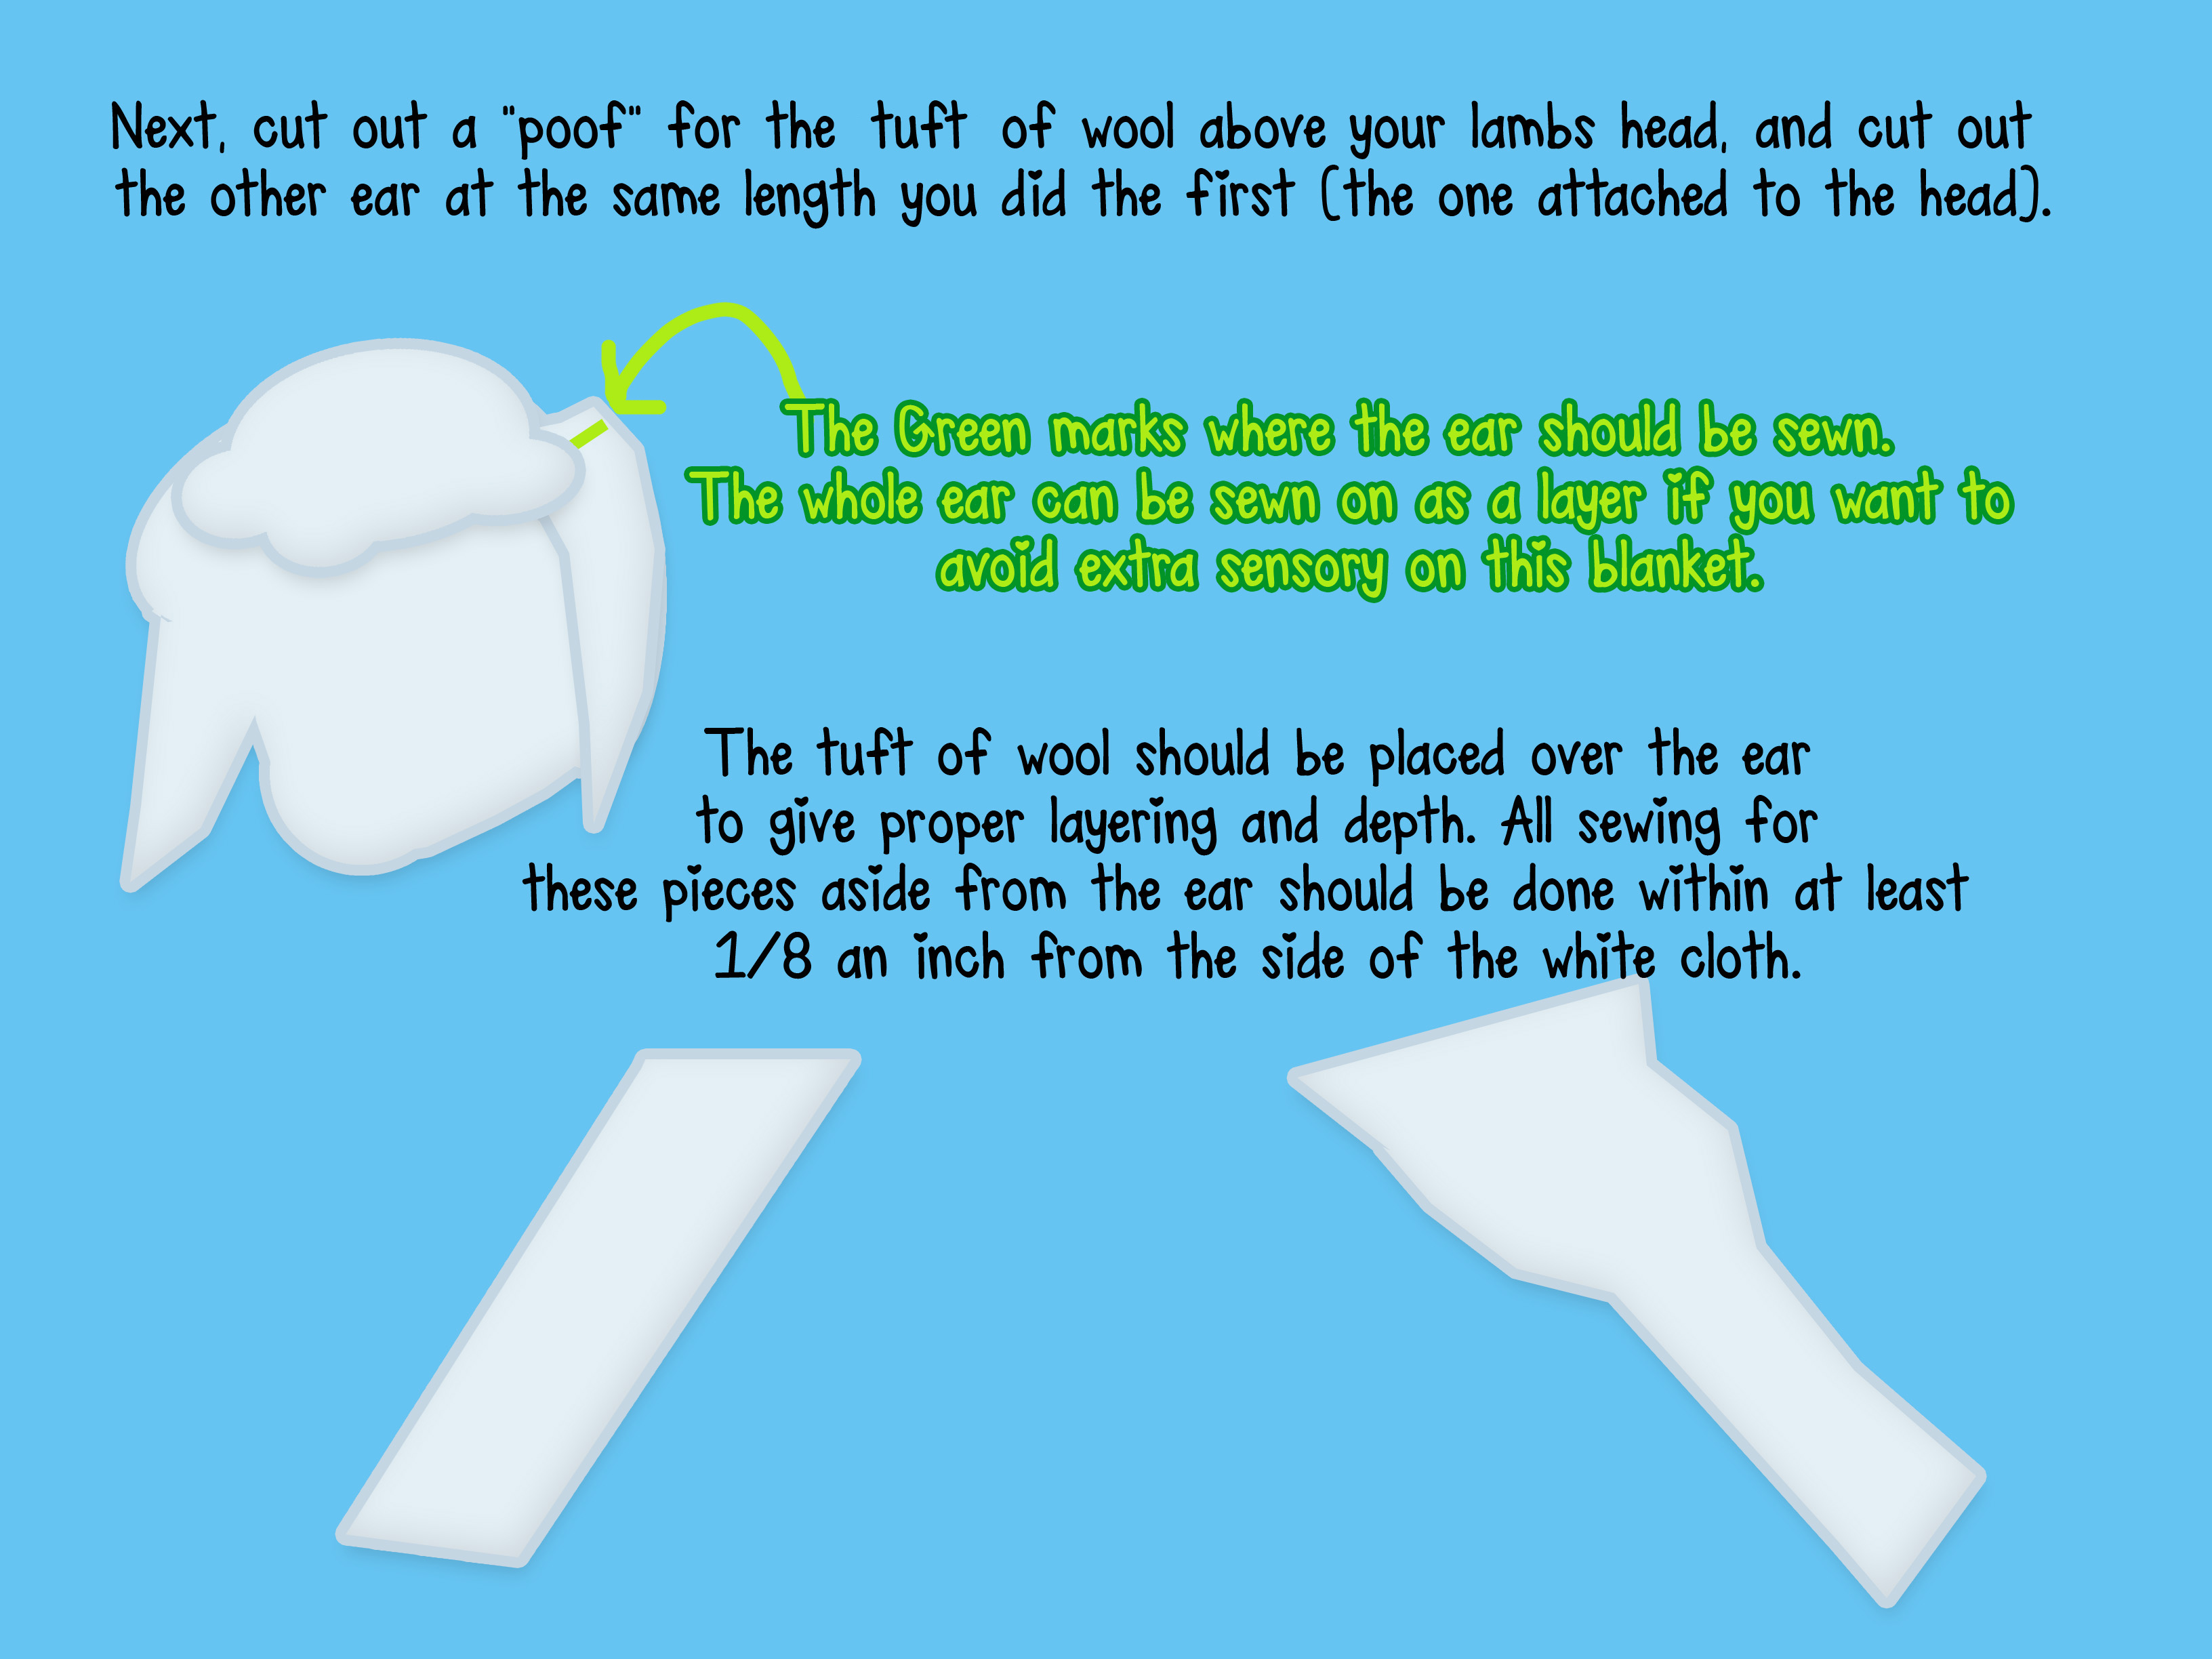
4. After you’ve sewn the ear and tuft, flip up the ear if you can. If you can’t your spacing for the next step will need to be repositioned.

5. Next you will need to cut the fluff. This is completely up to you on how you cut your fabric. I cut it like fluffy clouds. Once everything is cut out, start layering the pieces from the legs (covering a good portion of them so that the sewing process makes the body look fluffy even over the legs), and working your way up. 
6. In order to get that wavy look in the fluff, I sewed the fabric much higher than the first few pieces including the legs. The green lines will help you see what I mean.
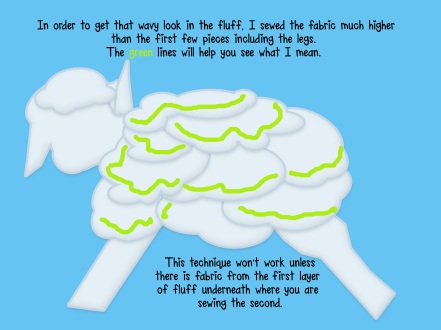
This technique won’t work unless there is fabric from the first layer of fluff underneath where you are sewing the second.
7. Next are the hooves, and facial features. Since I didn’t want to make a realistic lamb, I made the eyes and nose as almond shapes and simply sewed a line through the middle of them on the face.
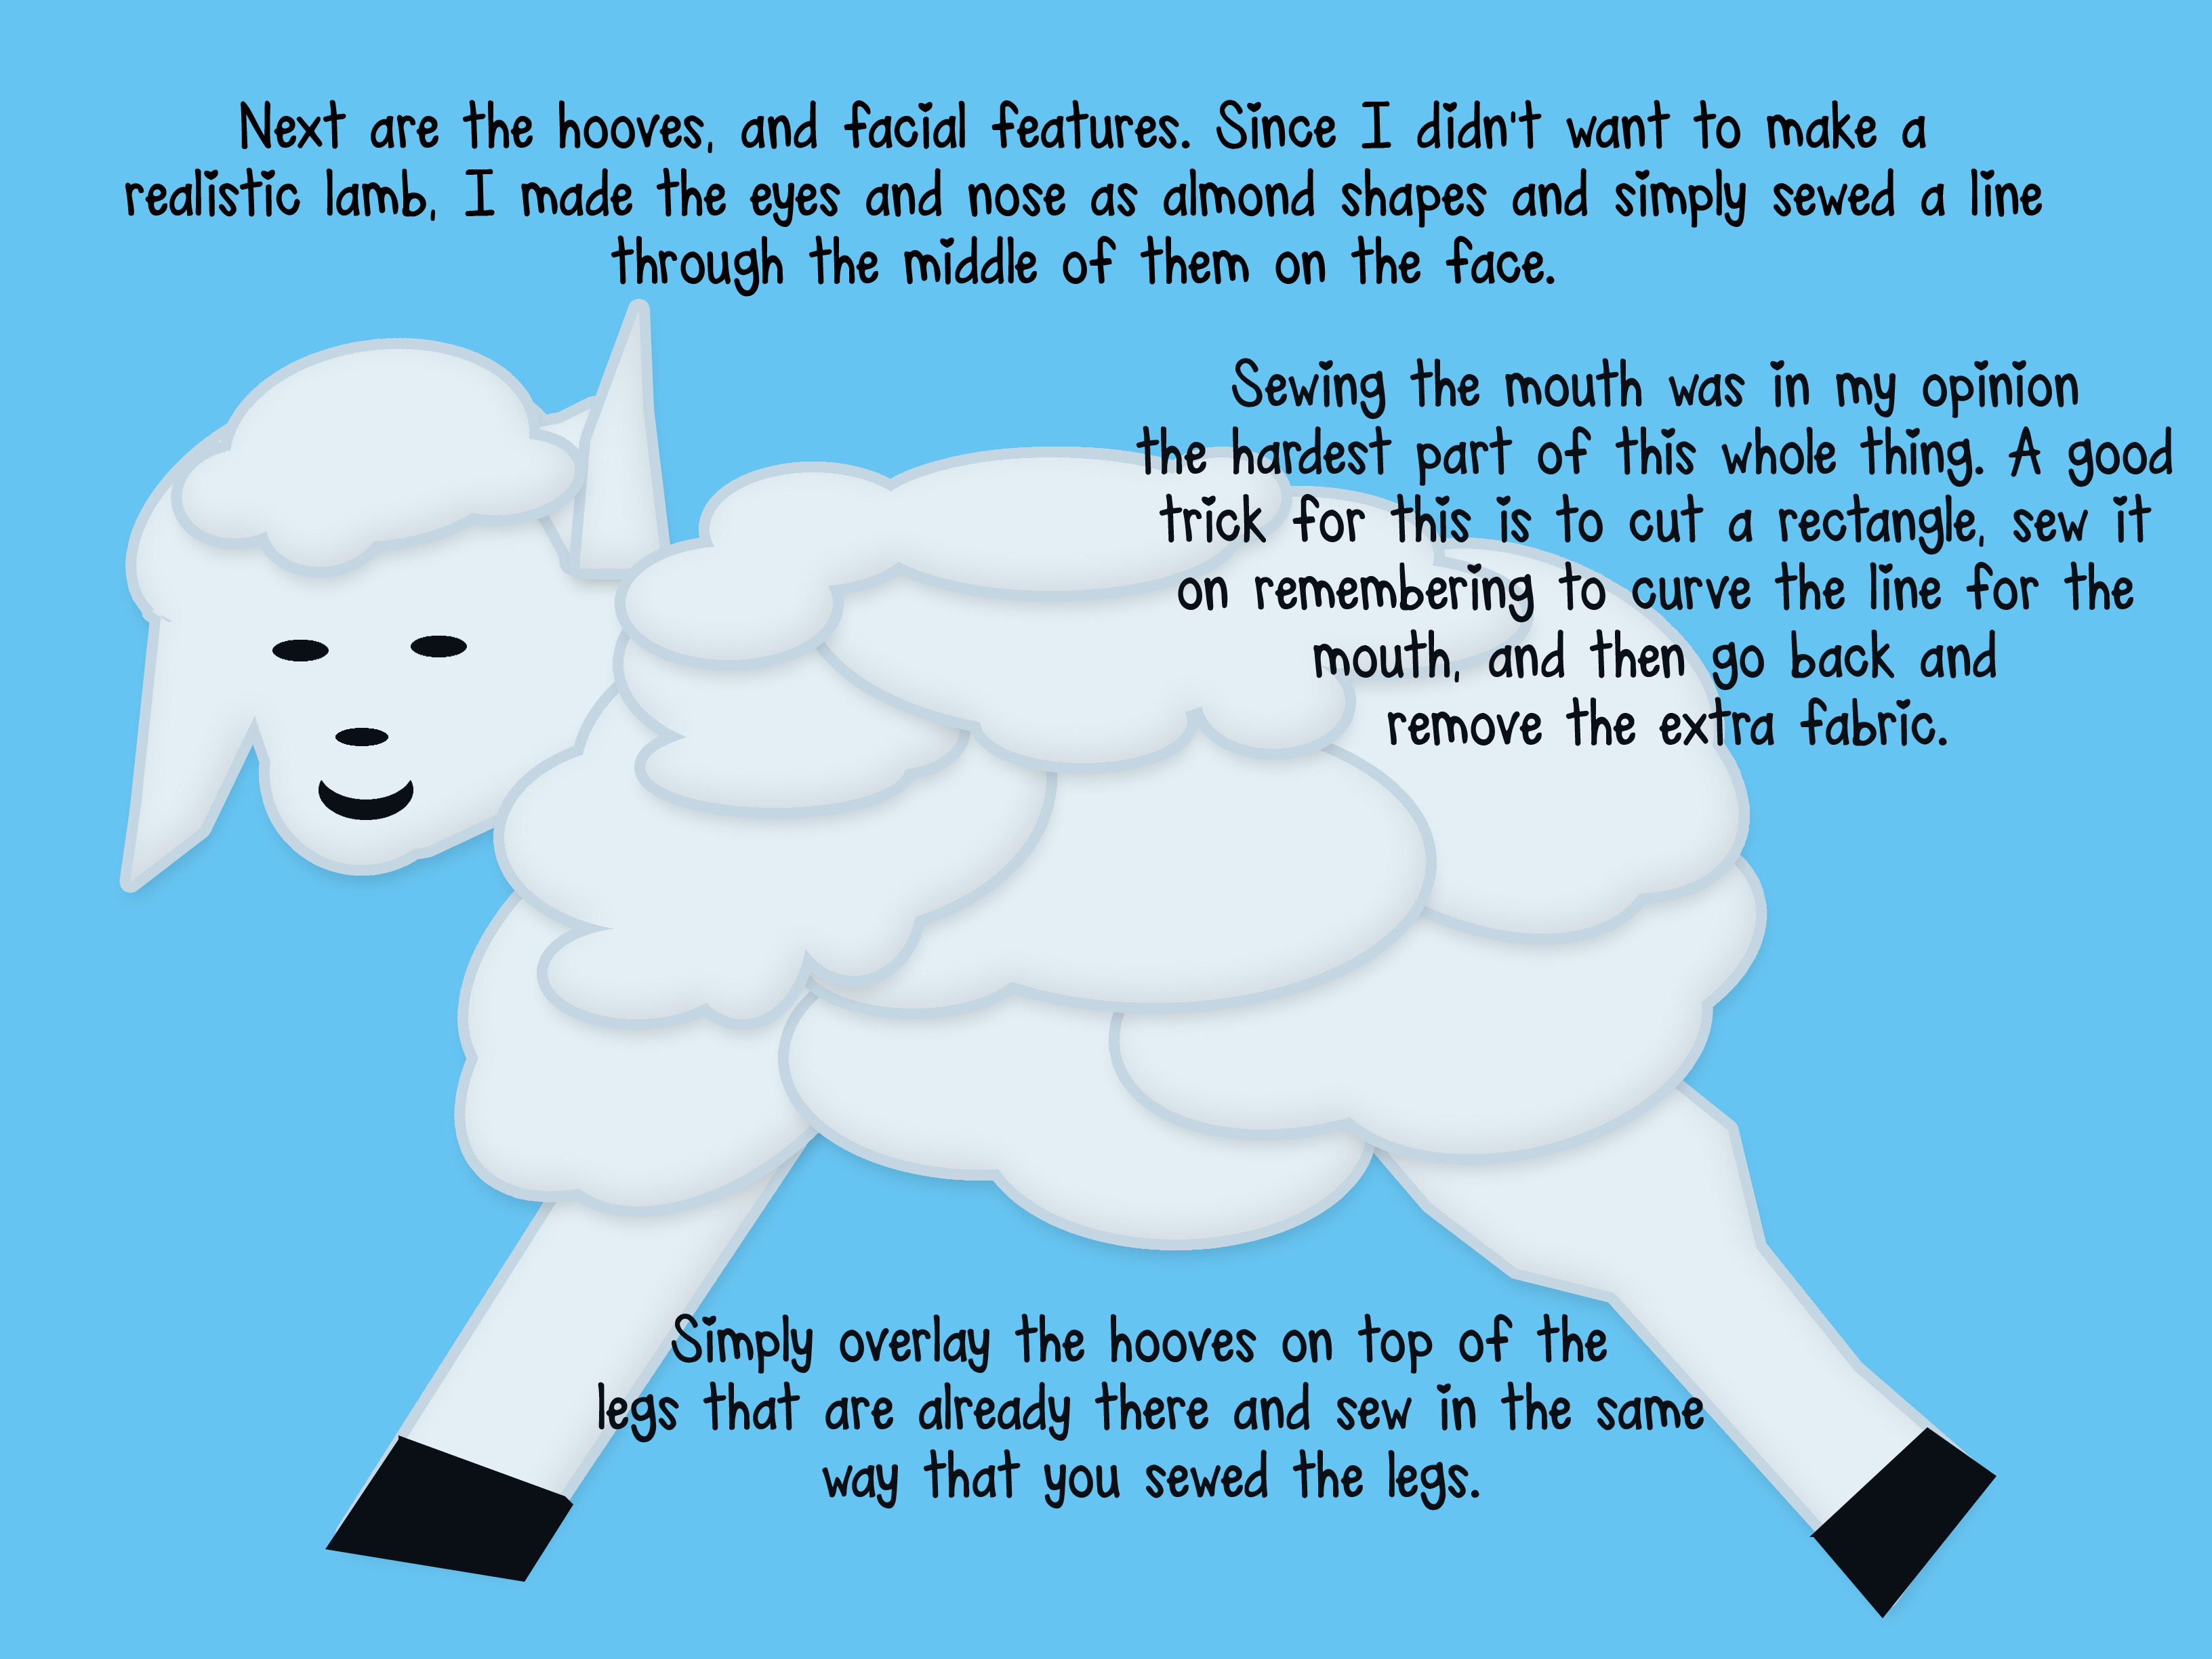
8. Sewing the mouth was in my opinion the hardest part of this whole thing.
A good trick for this, if your sewing strength with the sewing machine is low, is to cut a rectangle, sew it on remembering to curve the line for the mouth, and then go back and remove the extra fabric.
9. Simply overlay the hooves on top of the legs that are already there and sew in the same way that you sewed the legs.
And then your your completed Lamby Blanket should look similar to this:
My First Free Pattern Friday!
That grey box that stiffed me is back again. That’s the Test, Test post before this.
So I decided to go with the CM Punk Blanket as an easy start. The surfing blanket is actually going to be a two part series that I think will do better if they go one right after the other. So here is my Original CM Punk Inspired Crochet Blanket:
What you will need:
J Hook
4 Black Skeins (I used: Red Heart)
1 Caron (I used: One Pound)
1/2 Red Skein (I used: Red Heart)
CM PUNK INSPIRED CROCHET BLANKET PATTERN

First select the desired size. Adding or subtracting from the original blanket size of 3’4”x3’11” (LxW) will change the patter and everything to do with it. The original total skein cost was 1 pound white, 4 black and 1 red totaling in 6 skeins all together.
Regardless the size, the first step is to create the background. It is simply divided into three parts: Black, White and Black:

The blanket is simply half double crochet (or one and a half stitch) throughout the whole blanket.
To start:
Chain selected size or 3’x11” using a tape measure, or CH 105, CH 2, turn,
ROW 1: HDC 1 in your 105th chain from the previous row, HDC 105 times total (including your first one in this row) repeat throughout blanket. All three sections should measure in length to 13.3” or approximately 37 rows. [DEPENDING ON YOUR DESIRED SIZE]
When you’re ready to change color complete the last HDC, SC 1 and pull all the way through the last stitch, Turn,
Add the White by Slip Stitching with the new color through the last stitch’s loop. Tie your knot, SC 2. HDC 1 into first stitch, HDC 104 (105 TOTAL) and continue as you had been in the first section of the blanket.
Repeat this step TO CHANGE back to Black for the third layer, and complete black section with above info.
Once this is completed you should have three equal sections of black, white and black.
Before you start the logo do the edging. To keep with the continuance of the blanket, I choose to do HDC around the edge. (If this is your first time doing an edge it is simple. I did the edges as if I was only adding another row to each side. The only difference was the corner where I added 4 HDC into one stitch in the corner which helped continue the border to the next side seamlessly).
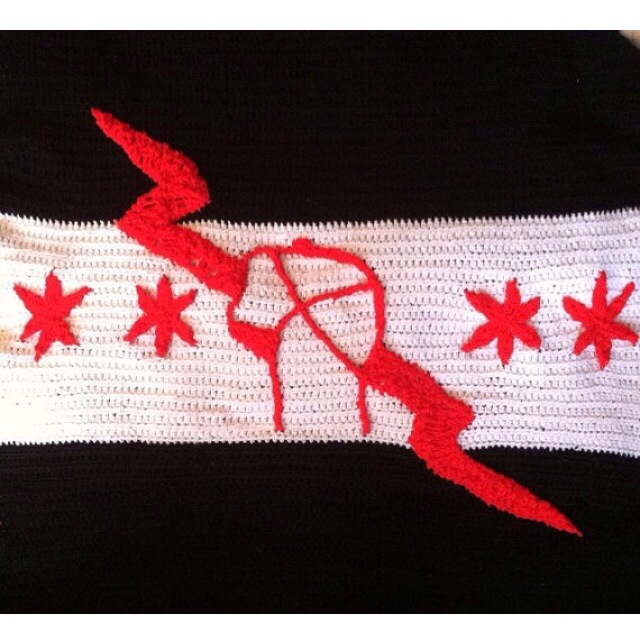
His LOGO…

This is also very simple. At the time I did not know how to do stars and it is very evident.

(Don’t mind the stars being slightly off, the blanket has stretched and appears bowed in the picture since its constant use by my one year old.)
If you’re looking for how many chains per each star or for the fist of lightning, I just don’t know. I can’t even count it myself and I was the one who designed it. Sewing in will make that an issue to count even if you’re careful.
First measure how large you would like the stars to be. If you have a Star of David design, feel free to use that here. If not, I used my hook’s length and chained three chains (not CH3), three chains that equaled the length of my hook for each star. So that’s a total of 12 in that size. REMEMBER TO LEAVE A LOT OF SLACK FOR SEWING IN. You can always cut down the slack if you have left too much.

Now I mapped these in a car on a long trip so I didn’t have the luxury of using other tools. If you are having a hard time mapping, or laying out the stars, use pins to pin them down for the lay out and sew them in; remember to take out the pins as you go.

After they are all laid out and sewed in, Chain a very long chain for CM PUNK’s FIST ONLY. Don’t worry about the X, filler in the fist, knuckle, or lightning on either side. Focus on only the shape and size of the fist you are looking to make. Again use the pins to help guide you along so that you aren’t damaging your blanket as you go. Remember to do the indentation in between the thumb knuckle and the index knuckle. This subtle area in the design as well as the indentation in the wrist on the opposite side of the hand is important in defining that it is an arm, wrist and fist. No matter how much slack you leave this is a big sew in job and will need extra yarn. I sewed in the basics on either end as far as I could with normal slack and then used yarn directly from the skein to fill in sew in areas. This helped provide less knots while sewing in.
 Next is the lightning. Again, ONLY CHAINING: chain as much as you need to almost bubble letter “draw” the lightning on either side, leave slack to sew in but you will need more just like the above fist explanation.

Once the lines are “drawn” chain two pieces for the “X” or drug free mark on his fist and sew them in.

Next is the “fill”. We will be filling the lightning, the knuckle, and the space under his thumb and base of his wrist. Chain an excessive amount to cover the area. If you have a hard time figuring out how much, stop, and sew in. This is a process and you need to take your time at it. It provides a nice sketch look when filling in. As you can see I have some white spaces in the lightning to resemble the logo on my husband’s shirt.

Finally the two additional steps to the stars; the reason it’s done this way is to make sure that the fist and lightning fit before bulking up the stars. It’s easier to remove them in case they wind up being too close to the fist, but need to be there in the beginning to help map where the fist belongs without elongating the fist. You’ll notice that there are two layers needed, the center that “beefs” up the star and stays low to the center too. That is sewn in first. The outer layer goes on last and is sewn in at all of the points and surrounding the star. Be careful around the 6 tips so that they stay pointy and do not become round. To stave off this result, sew in multiple times in the same area or point to keep it super tight and pointy for best results.
After all the steps are completed, CONGRATULATIONS you have your own CM PUNK Crochet Blanket.

If for any reason you find you have questions on any of these steps, please feel free to contact me on Etsy messages, or directly at plentifuldesigns@gmail.com. Thank you!
Let’s Try This Again…
Getting Ready for My First Free Pattern Friday But First… was supposed to actually have a post there. Since I cant completely remember what I wrote aside from thanking belikewaterproductions and cristian mihai for following my blog, I think I might just post that.
Honestly, either my computer is starting to have bad habits like my iPad, or maybe I am just hallucinating. Ok, if there’s a grey box that appears instead of the normal white one, from experience, dont waste your time typing in it, wordpress wont publish it correctly. Got it!
Aside from that, I am looking forward to my first ever Free Pattern Friday. I have a couple I could do. I just finished my two part surfboard one or I could post my husband’s favorite, the CM Punk Inspired Blanket that I made my son some time ago:

it can also be seen in my shop here: https://www.etsy.com/listing/162881294/wwe-cm-punk-inspired-crochet-blanket?
I would love to know what you think.
Thanks.
